One of our go-to crafts around here is shrink art. Ever since my sister gave us the mind-blowing information that #6 recyclable plastic is shrink capable, whenever my kids want a craft, and I'm feeling non-mess, more independent crafting shrink art is what I can pull out. Wait, you say, did I hear that right? #6 plastic is shrink art? YES, it is! I save packages from deli sandwiches, some produce, lots of take-out - wash it out and VOILA! Shrink art extravaganza! Free crafting is the best crafting!!

A few cons I've discovered - #6 doesn't shrink as uniformly as the store-bought stuff, and even if you rough it up with sand paper, colored pencils don't work as well on it (colored pencils don't work AT ALL if you don't sandpaper it). So we use a set of permanent ink markers and all is well. My kids like to trace their favorite characters or make freehand art. Punch a hole before baking, and make necklaces, charm bracelets, sun catchers, whatever! They love the detail they can get in such tiny charms. You can tell the detail varies with the age of the artist - as always!
RINGS
The last time they got out the plastic, I wanted to try something I'd seen on Pinterest - making rings. Only I couldn't find where I'd pinned it, so we made it up as we went along. (note to self: clean out and organize Pinterest boards!)
The first thing we discovered, #6 plastic DOESN'T WORK WELL FOR RINGS. It was OK, it shaped fine and looked fine, but the inconsistent shrink rate meant that every ring was a whole different story. Sometimes it worked great, sometimes a warped mess. Also it's a bit thicker, which was not ideal. So while we still love #6 for other art, we had to try something else if we wanted rings.
Solution? Pull out the professional stuff. I had a package of Shrinky Dinks Frosted Ruff n'Ready, and we were set to make rings. A little experimentation with size and we were off.
 |
| For my older kids (9-13 years old), we found the right pre-shrunk size to be 5 1/2" x 3/4". For my younger girls (5 & 7 years old), 5" long was perfect. The 5" length is great because the sheets of shrink art are 8" x 10", so cutting a sheet right down the middle gets a high yield of rings per sheet. |
 |
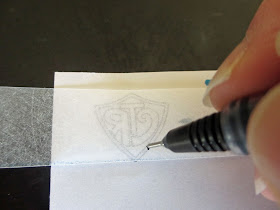
We chose to make CTR rings with our shrinky dinks - though after they were done, there were many other varieties of original art rings as well! The first and VERY IMPORTANT thing we discovered was that the rough side, the side you draw on, is the inside of the ring. This means that any writing needs to be done MIRROR IMAGE. I printed out a backwards CTR, and the kids chose their colors and got tracing.
 |
| The kids went to town on their designs. I love how their personalities are reflected in their unique rings. For my youngest, who lost interest, I finished her sunshine ring. Just remember to draw on the ROUGH SIDE of the shrink art, and you can use colored pencils on this stuff, but if you use ink use PERMANENT INK. One of my daughters just grabbed a felt tipped pen and after wearing the ring for a while, her finger was black with ink and the ring was smudged. |

Shrink the rings according to the package directions (mine says 325 degrees for a conventional oven for about 3 min or until it lays flat). This is the fun part for kids, so turn on the oven light and let them watch the antics of the shrinking plastic! Remember to place on brown craft paper for baking - I use grocery bags cut in half. NOTE - these do sometimes stick to themselves while baking. Carefully, and I wore light knit gloves for protection, pull the pieces apart and return promptly to oven.
Remove from oven and quickly (again I wore gloves), wrap around a round object of the right size. |
| You've got about 10 seconds to get this done, so have your mold ready. We looked around the house |
and ended up with markers and fingernail polish lids as offering the best diameters for rings. If you mess up, it cools too quickly, or something else goes wrong, just put the ring back in the oven for a couple more minutes and try again. We did learn though that this has its limits. Notice the difference in color in the floral ring above - it was baked repeatedly because we couldn't get the size just right. Repeated baking affected the color, but it also made it brittle. The ring broke a couple days later and we had to try again with a new ring.
 |


 |
| Had to throw in the Green Lantern ring too - for good measure! My kids made magic rings, name rings, rings until I ran out of patience! The only ring they couldn't get to look just right for them was the One Ring ;) |
As always, I love to hear comments, especially if you try it yourself. Send me pictures and I'll post them! Have fun!!


Thanks for the fun idea! The girls will love this.
ReplyDeleteDo you seal your rings? I know the last time we made necklaces the permanent ink would still come off if rubbed.
ReplyDeleteThis is awesome!!! Thanks so much for the tutorial!! Is there a way to get the CTR template. I'm not even sure how to go about making it.
ReplyDelete