I have been dying to get this written up and posted!  It is a, long post - because there is whole lot of FUN!! Chloe delighted me by choosing a fairy theme for her birthday party.  As a life-long fairy obsessed aficionado, my mind was bursting with ideas - only a fraction of which actually came to life.  But what did come together tickled me pink!

The invitations were pretty simple.  I adore Cicely Mary Barker (my collection of her books is on the 'don't touch without permission shelf', although my girls have duplicate well worn versions on their own bookcase), so one of her delightful fairies had to make an appearance.  This pixie, who reminds me of Chloe, is the Candy Tuft Fairy.


Guests arrived through a fairy bower of tulle and flowers.  Tulle is a fantastic decorating option because it gives a lot of bang for the buck, especially when it goes on sale.  Draping it, tying it in bows, gathering it over windows, so many possibilities for frilly-girly sweet decor!  (Pic doesn't do it justice, it was so sweet)
The hanging light over the table became a floral chandelier with giant flowers, curling ribbon, and dragonflies.  It was my favorite, and I left it up for at least a week after the party!  Oddly enough, it was all made of on-hand supplies.  The giant gerber daisies I had bought to go with flower-fairy costumes a couple halloweens ago, the giant tulips are actually hats that my girls got with their cotton-candy at the Tinkerbell Disney on Ice last year.  And the dragonflies were garden decorations that once-upon-a-time were attached to stakes, but I had removed those and had mounted them to my boys' jungle themed bedroom ceiling when they were little.

Toadstools are just as essential as flowers for a fairy party, so we set to work making a bunch to place around.   See my post for how to paper mache some toadstools of your very own!  

 
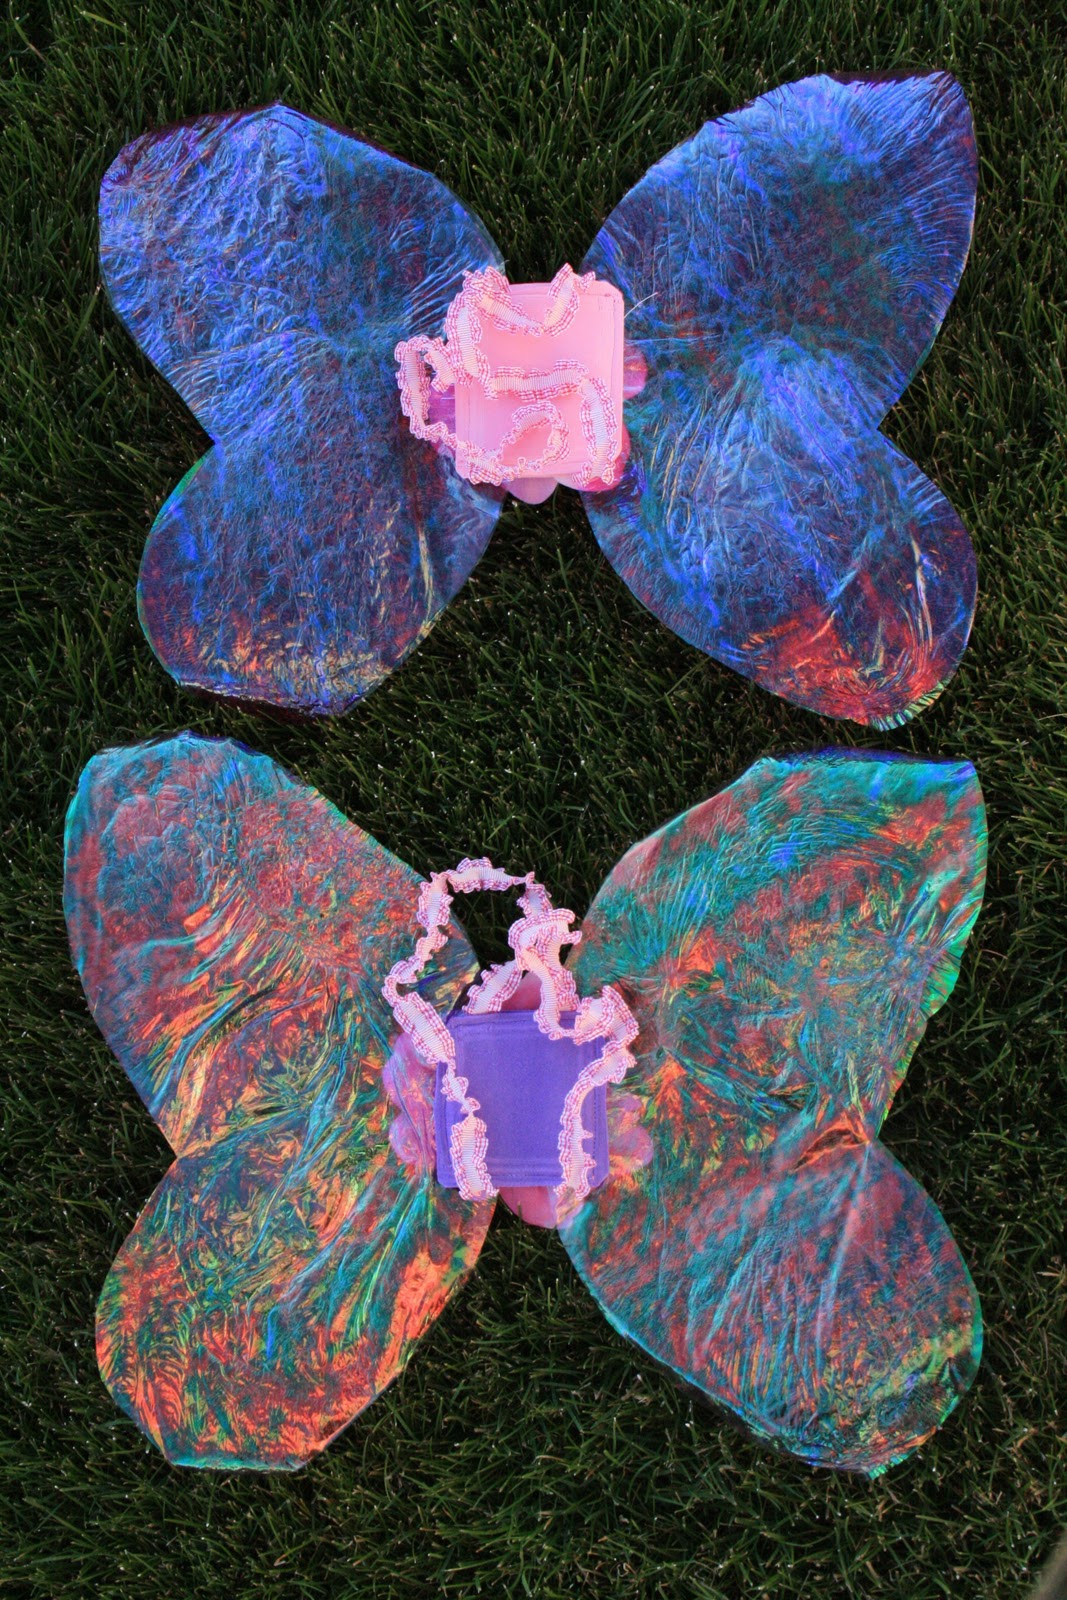
Without wings, a fairy just isn't a fairy!  But without the budget to purchase wings for all the guests, (and of course, the dollar stores never cooperate by having them when I want them, but a mere few weeks later have a whole display of wings in an assortment of colors!) I had to get creative.  I love nothing better than to get creative!!  I'll whine about it, I'll complain that stores should anticipate my needs, but in truth, I love trying to figure out how to do something unique.  I already knew that I did not want to do the tights-on-a-coat-hanger method of wings.  It is a lot more work than the tutorials make it sound like it is, and I've never been happy with them.   So I created these fancy little gossamer wings that look very realistically pixie-like.  For the tutorial, click here.


Finally, after playing flying games, and changing seasons games and other fairy games, the fairy guests did the last obvious necessity - they made fairy wands.  The simplest of the simple crafts - a funfoam wand that they decorate with glitter, jewels and stickers.  Lovely.


Then as they were leaving, they received a sweet little party favor that had strawberry candies, bubbles (I painted the lids with glitter paint to make them more pixie-dusty), and a butterfly barrette.

Happy Flying!!

For the fairy party decor for Chloe's birthday, toadstools were top on my must-have list.  There is something magical about the red polka-dot 'shrooms that makes you know for sure that gnomes and pixies are nearby!

My kids hadn't done paper mache before, and it is a huge part of my own childhood, so I decided to declare a paper mache day. I constructed the bases out of pringles cans and large paper bowls, and paper towel rolls with smaller paper bowls to get a variety of sizes.  I overestimated the amount we'd be able to do, and had a bunch of naked bases left over, but a girl can only do so much.

Now this is the point where I look like a fantastic mom doing crafts with my kids and being all creative and 'with it.' I should totally leave it at that.  You're all so impressed with me, right?

   But oh dear, paper mache got SO out of hand!  It got in hair and on clothes, the kids kept shaking their hands off and flipping it far and wide.  They kept going in and out of the house and getting it all over the doorknobs and on every surface indoors and out.  And every one of them left a partially finished project when they decided it was lunchtime and I had to finish them all myself in an extremely cranky mood.  
I'm pretty sure at one point in our fabulous bonding craft time, our entire neighborhood could hear my sweet mommy tones as I discovered paper mache cement had set up in so many places!  I do think that the kids had fun though - for most of the time.  And we did end up with fabulous toadstools!
  
For those who have never done paper mache - here it is, simply.  Paper strips (I like newspaper).  Mix water & flour (sometimes I add some school glue if I want it really tough).  Not as thick as pancake batter - much more watery.  Dip the strips. Cover your surface. Wait to dry. Repeat for another layer.  Wait to dry.  With each layer you can shape and add detail. Wait till completely dry.  Spraypaint for the base.  Red on top, cream stem, black and grey under the toadstool crown.   Kids painted polkadots.    Voila!

mache'd toadstools - already they have character
Being painted - looks like a toadstool garden sprouted in my yard!

Painting spots


Tinkerbell movie looks right at home!
Pin It
Without wings, a fairy just isn't a fairy!  And I've never had great luck with the tights-on-a-coat-hanger style of handmade wings.  So I wanted to create a unique and airy looking gossamer wing for little pixies to wear for dress-up, and my criteria were: inexpensive, pretty, fairly easy to mass produce for birthday party guests.

closeup detail of the iridescent pattern
In my brainstorming, my mind came back to my all time favorite blog, filthwizardry.com, and her post about using plastic bags as iron-ons.  (http://www.filthwizardry.com/2010/03/iron-on-decals-from-plastic-shopping.html)  She said that she got her inspiration from hearing that people iron plastic bags together to create fabric.  What if I were to iron clear cellophane plastic together to make it thick enough to make a membrane-like wing?  

I happened to have some red cellophane in my craft stuff, so I tried it.  If you care to know how excited the result made me, ask my husband, who had to witness the giddiness.  The layers of cellophane, placed between two pieces of paper, bond to each other and become thick, but they also shrink (how much depends on how long the heat is applied and how hot the iron is - it's kind of trial and error.  As they shrink, the layers form these beautiful veins that look just like a dragonfly wing!  I had only wanted the plastic layers to adhere to each other to gain strength - but the way that they formed patterns of veins that look so organic and insect-like was a delightful discovery!!  

The next day I was at the dollar store and picked up a roll of clear and two packages of iridescent cellophane tissue squares.  I am not sure what the difference is - I don't think there is any at all between the 'tissue squares' and cellophane rolls, but in the packaging that called itself cellophane tissue, it was colored, and that's what I wanted.  

I cut out one layer of clear and one layer of color for each wing.  NOTE: I found out the hard way that my colored cellophane had a right side and a wrong side - this was significant both for cutting and for ironing.  Cutting all the same direction, just like cutting sleeves out of fabric, means you end up with all left wings, for example, and no rights.  Also, the iridescent side had to face the clear cellophane or it would stick to the paper when the iron touched it.

cellophane wing before being ironed
cellophane wing after being ironed
I cut my wings to the very edges of an 8 1/2" x 14" sheet of paper, because that's what I had on hand to put the cellophane between the sheets of paper for ironing.  The wing shrunk about 1" all around.  I did burn a couple wings figuring out how long and how hot to iron them - too hot and they melt completely; too cool, they bond without as many distinct veins.  I'd like to try more layers to see how tough I could get them.  

I'd also like to try to figure out a support system because as much as I loved how they fluttered in the breeze when the girls wore them, it would be fun to have them more controllable and stable. They are fun for dress up, but they'd also be great at medieval festivals and renaissance fairs :-)  I just think they're beautiful!  I feel bad because I just did not get pictures that do them any justice at all :(

Each separate wing was then glued between two squares of craft foam, with loops of cute elastic trim also placed there for shoulder bands.  After they dried overnight, I sewed around on my machine to reinforce (I'm uptight like that) and glued on the flower and jewel.  Done!  Wings!

Today I'm attempting to cover Thanksgiving this weekend before it morphs completely into Christmas.  I adore fall at my house because I am a total earth-tone chick and as soon as stores start putting out autumn decor, I salivate.  I don't decorate for ever holiday, but I cannot get enough fall leaves, gourds and pumpkins!  Just so beautiful!

This fall I've had a bit of a turkey thing going on.  First off, I've had a new church calling.  I now am the primary chorister - so I created my friend Tom the turkey.  Oh, I did NOT sew this adorable turkey!! I bought him at Hobby Lobby.  But then I created a disguise for him.  For each song the kids learned and/or sang well, they earned Tom a new piece of his disguise, with the goal being to get him unrecognizable by Thanksgiving so Farmer Brown wouldn't be able to find him.  Disguise pieces?  A wig (I made this of craft doll hair),  glasses (courtesy of our Ms. Potato Head + googlie eyes for silliness factor), tutu (just sewn on an elastic band - super easy), boots (using a doll clothes pattern), a necktie (felt, I didn't feel like interfacing a turkey tie), and a sombrero (doll straw hat + rickrack with beads hand-sewn to each peak).  So much fun!  I giggled the whole time I was sewing the stupid tutu just thinking about how ridiculous the concept of a turkey tutu is!


 If there is one craft item that makes my husband crazy, it's glitter.  I usually try to avoid using it, in any form, just to be courteous.  But it couldn't last forever.  Into all crafters' lives, a little glitter must come.   Glitter, all sparkly and shiny fits in perfectly with the fireworks of Independence Day.


Goal: a craft that was 4th of July related, easy for all ages, easy for me, and fun for the kids to play with.  What kid doesn't love a good wand?
   
Materials: a package of 6" fun foam stars in red, white, and blue (pre-cut all the way, baby! sorry I forgot to include them in the picture), 12" dowels,  spools of 1/4" red, blue, and silver ribbon, felt star stickers, glitter, glue dots.  


Cutting the ribbon to 16" lengths, then tying it about middle makes perfect streamers, which need a dab of glue (E6000 is my favorite) to stay put. 


Then I ran into a snag.  When I glued the stars directly to the dowels, the foam was thin enough that the dowel tip would push a hole right through.  So I scrounged up some batting bits and wrapped them around the dowel tips to soften the edges.  This was quite the serendipity because I inadvertently ended up with slightly puffy stars, which was cute.  Glued 2 different colors back to back and pressed under some books until the glue dried.  I kept thinking I should just use hot glue, but I've had a bit of bad luck with hot glue melting fun foam, so I've become gun-shy.  It sure would have been easier though.

Now so far, pretty standard stuff.  The wands are all constructed and ready for kids to decorate, and the felt star stickers were perfect, but it wasn't quite crafty enough to just slap on some stickers. I wanted more creativity.  
Enter the glitter.  


The original plan was the classic glue, sprinkled with glitter routine.  But I needed it to dry faster - I wanted instant play.  And since I was using this both for my 3 year old Sunbeam class and my kids and their cousins, I needed less mess.  I decided to experiment with glue dots.  I know that they stay tacky for, basically, eternity, so I didn't know if they'd work, but they did.  They reach a saturation point where there is so much glitter that there is no exposed stickiness.  And the bonus?  They make the most perfect, round polka dots!  I used a paper plate with blue, one with white, and one with red, two different diameters of glue dots, and just let the kids go crazy.  (A little too crazy for the littlest ones who ended up with more glitter on them than on their stars.)


I was totally pleased with the results.  Even the littlest toddler niece was able to push the glitter onto the dots, which made her just tickled.  Every star ended up adorable, but completely unique.  Some kids are planners and measurers, others are random.  Now that I know about glue-dot polka-dots, I'm excited about the possibilities!
Pin It
 As always, I got myself a little out of control with this project.   It all started with this little package of necklace charms.  That's all it took.  I saw them and I thought "Mother's Day silhouette project for my class!" Lucky for me, the charms went on sale the next week, and I was off and running.


Making silhouettes is a little time-consuming, but fairly easy in photoshop.  I took pictures of each of the children in profile.  Knowing that I was doing silhouettes, I chose either the white wall as a background, or the window - and it helped when I remembered to set my camera to not use a flash.   My sister, Natalie, sent me a fantastic link that made it go even quicker, since her technique is more efficient than what I had planned.  http://craftingchicks.blogspot.com/2010/04/silhouettes-for-mothers-day.html

They turned out beautifully!  In fact, it made me a little sad to shrink them to the tiny size to fit in the charms, because they look so fun bigger.  But as the entire point was the charms.....

Here is a before and after of one of my darling little sunbeams, and another cute one - I love the hair.

With the silhouettes figured out, I moved on to the necklace itself.  Here is the summary of my goals for this project:
  • The kids do as much as possible themselves.  (The lesson title that week was "I am thankful for my hands" - so a "hand"made gift was the biggest emphasis)
  • A pretty final product.  Something that could actually be worn on days other than Mother's Day when the average fashonista Mom can be seen to sport a fruit-loop necklace.
Not too tall of an order, eh?  A beaded necklace with pretty beads seemed to fit the bill.  I did some research and was intrigued by the couture textile necklace trend, that uses ribbon and other fabric objects to make jewelry.  Ribbon was the perfect base for little hands to thread.  I found this picture as my inspiration.  Lovely, eh?  Though I decided on a clasp instead of a bow - more secure for a mom with toddlers tugging on the necklace. I figured out how to add the clasp by looking at the picture below.


I ran into my big problem next.  I could not find beads with big enough holes for three and four year olds to thread, that looked like anything classy, AND that didn't cost at least $5 per bead.  I'm on a budget here, despite my big ideas :-)  So what do I do whenever I encounter something I can't find in a store?  I figure out how to make it myself.  Once I accepted that this was what I'd have to do, I was actually really excited because having the kids not only string the beads, but make them themselves would be even more meaningful!

After online research and a half dozen library books on bead making, I settled on polymer clay.  If the kids wrapped the clay around knitting needles, the holes would be perfect size.  I bought a Studio by Sculpey in a really nice blue, and a silver (another Sculpey, but I can't remember the specific name)

The first step in working with polymer clay is to work it until it is soft enough.  Some books and websites suggest putting it in a food processor or a pasta machine.  I divided it into chunks and gave it to my own kids!  They played for over an hour, making sculptures - like this one that Lily made of me (perfect likeness, I think!), and rolling different objects on it to make textures.  It was  a blast!!  When they were done, I took a chunk of blue and rolled it flat with my rolling pin covered in peel-and-stick so the clay wouldn't get on it. I alternated layers of silver and blue until I had one big flat slab.  Then I cut the slab into squares and rolled them loosely into balls that would each make a reasonable size bead.  This prep was so that the kids would be able to grab one, make it whatever shape they wanted around the knitting needle, and still end up with relatively uniform beads.  By rolling the layered clay, I achieved the marble effect I was after.


The class had so much fun with the bead making!  It was adorable to see how they giggled and enjoyed the clay.  Except things didn't turn out exactly as planned.  A couple of them grasped the concept, and made roundish beads from their balls of clay.  The rest squished it all into one mass along the needle.  I thought I would take it all off and do them myself, but then I decided that it could be salvaged.  I squished down the biggest lumps so that the beads wouldn't be too thick and heavy, then I just cut the clay stick into sections to make barrel beads.  They have great personality because they aren't uniform - but they're classy enough that they don't necessarily look like stereotypical kid-made beads.  Bake according to the directions on the clay.

Finishing up the beads with a nice couple layers of a high gloss clay glaze, I was pleased with the results.


Pre-cut the ribbon before class, and add the crimp thingies onto the ends to give a nice stiff tip for the kids to thread through the beads.  We spent most of class threading beads, then, as the children decorated cards, I attached the clasps using jump rings.  We wrapped our gifts and took them home to (hopefully) pleased moms!


One more finishing touch, to make sure the moms knew that the kids had made the necklaces themselves (except for the silhouette charms), I wrote a silly little poem that went with the "I am thankful for hands," lesson theme.  Here's the poem.  I hope all the mothers out there had a fantastic day!!  I sure did!!


My hands turn the pages
While your hands hold the book
My hands reach for something high
Yours lift me up for a better look

My hands hold the rope
Your hands push the swing
My hands get scraped up
Your hands soothe the sting

Your hands do so much for me
They clean, they cook, they play
They hold my hand to cross the street
They show me how to pray

Once, around one of your fingers
My tiny hand could barely cling
Now I'm growing bigger
My hands can do so many things!

I'm thankful for my hands
So I could make this gift for you
And my hands will show I care
With the helpful things I'll do

For all the things your hands 
Do for me each and every day
I love you, Mommy, and
I say, "Happy Mother's Day!"

Footnote:  This morning I found this post and wondered if maybe I over-obsess about things.  This necklace craft uses clay kid-made beads, and it is adorable.  Hmmm 

 
© 2012. Design by Main-Blogger - Blogger Template and Blogging Stuff