Showing posts with label kids fashion. Show all posts
Our elementary school this year had over 100 Elsa costumes and over 50 Anna's from Frozen! And my youngest two girls were among that number.  It was like a sea of blue!  My Elsa, predicting the large numbers, was determined to stage a sing-in of "Let it Go" during recess with everyone sporting the proper costume!

The thing I love most about costumes - and probably the reason I invest so much of my time and energy into sewing and creating them for my kids - is the amazing springboard they are to imagination. I am not a fan of Halloween because of ghosts and gore; I love Halloween because I love watching children have permission to be whatever they wish for that day. I watched Captain America somersault to hold open a door for a princess, who graced him with a regal curtsey. Every year I see kids come out of their shells and become the most outrageous characters and I love it!

This year all five of my kids wanted new costumes. That's a record. Normally a few of them plan something based off of something we've done in the past that requires me to make two or three new and modify some hand-me-downs. But this was unprecedented. And a little insane.

And because of the scale of it, I'm breaking my posts up as I did my sewing. Starting with the little girls - I'm covering Elsa and Anna by themselves. We'll get to the other kids in due time.

Elsa:

Honestly, I'm not sure if there is any girl left in the world without an Elsa costume who would need a tutorial, but since I used some rather interesting techniques, I'll still probably do a tutorial about the full insanity soon, but today I just want to get pics up. So here is how my Elsa turned out:


Anna: 

I can't imagine a more perfect personality for Anna. This was more than an ideal costume for my sunshine girl.


Sisters: 

But the true story here is about sisters.


With the huge Disney hit, Frozen, making all things nordic popular this winter, it's quite the serendipity that I actually started my girls' Scandinavian dresses a whole year ago when I ran across the fabric for the skirts - long before I'd ever heard of Elsa or Anna!

That stripe, replete with birds, hearts, scallops & baskets just cried out for Scandinavian styling.  But I knew that, being a complete novice to embroidery, it would take me FOREVER to finish what I had in mind, and I'd need to start early.  I was right.  A whole summer & fall of design and embroidery (and a whole lot of picking things undone) had to happen before I was happy - and how surprised was I to discover that my stylings were well-timed to be completely in fashion and my girls could fit right in at Arendelle!

With embroidery and details that whisper winter in snowflakes and lace, this year's coordinating dresses each have their own unique flair.
How about we go littlest to biggest?
Evey's dress pattern was mostly a classic vintage (Butterick 2159).  I very much wanted to make the jacket too in a grey wool, but never got to it.  I obviously changed the sleeve from the original pattern- added some fullness (this is achieved by simply increasing the arch on the sleeve pattern piece then gathering instead of easing the sleeve), and increased the length of the sleeve to the wrist.  I also added a wide sash tie in back, shaped the neckline a little, and put trim around the neck & at the bottom of the skirt.  For the sweet, scandinavian look, the skirt trim is a scalloped lace with a scalloped grosgrain ribbon.
The embroidery on Evey's belt was a lot of fun!  Most of the designs for most of the girls' embroidery come from one of two gorgeous craft books by the same author: Christmas Crafting in No Time & Scandinavian Needlecraft both by Clare Youngs.  I have checked both of these books out from the library so many times I've lost count! Finally bought Christmas Crafting for myself.  Someday I'll own both...


For Chloe's dress, I used a McCall's pattern - 2661 - also vintage.  I've made this pattern before, with the vest, and that's what I planned on making for Chloe.  She had other ideas - as always.  I wanted the vest in red with embroidery on it - she picked View A because she liked the placement of the trim. I admit it, she was right.  I LOVE the way hers turned out!
Modifications to this pattern include: sleeves (they were cut out per the pattern, but when finished, Chloe didn't like how "poofy" they were - she said she felt like a pirate.  So I cut them down to a slim silhouette and added a red trim to match the bodice) and skirt (this one was a DOOZIE! As is, the skirt is not at all full. It is almost straight with only a tiny bit of gathering.  I wanted FULL.  But with the empire waist, I didn't want a tiny maternity dress either. So instead of gathering the whole amount in to the waist, I only gathered in what the pattern called for, then I inserted gores at the sides, front and back - triangles that tapered out at exactly the waistline.  This made for one of the most difficult hems I've ever encountered - trying to get it straight was a nightmare - but it gave me the result I wanted in the end.)
 For the embroidery, I used several of Clare Young's designs from her books, coupled with some of my own ideas.  I'm including a pic of my design sheet to show the process.  Starting with a copy of the pattern piece, I trace out general ideas, then add in details.  As it develops, some of the elements don't fit quite right - note how the flower is replaced with another taped on top.  At the bottom of the page I have several rejected doodles for potential ideas.  If at first you don't succeed...


The finishing touch on Chloe's outfit was a tatted snowflake made by a dear friend.  She didn't even know she was making a perfect accessory for us! (And don't you love that scalloped ribbon? Hobby Lobby!)  I think tatting is stunning!


And finally, Lily.
 Miss Lily's dress was made from an amazing pattern from a company I'm not sure is around any more - Advance 8352.  Can I tell you how full this skirt is?  Yummy.  I didn't change a thing.  Kept the 3/4 length sleeve that is eased at the shoulder but full at the elbow - kept the perfect skirt length - kept everything! The shape of the "belt," which is actually an inset not a belt, is an ideal canvas for embroidery.  I decided on the image of the bird that is common to scandinavian design, and as I couldn't find one that was exactly what I wanted, I designed one, which you can download here as a .pdf. Enjoy!
One bird looked strange and huge though in the middle of the belt, and it was my graphic designer brother who came up with the idea of two birds facing. Voila! LOVE! I also added a bunch of snowflakes & a few hearts to the border of Lily's skirt - getting more varied and adventurous as I went along because I got so used to doing them and was no longer using any pattern but completely free styling.
  Most of the embroidery on all three dresses is done in a simple to learn whipped-back-stitch, with many French knots throughout.


I wanted to do Lily's hair in a crown braid, but it has been so cold this winter, and her beautiful long hair keeps her warmer.  So I tried a modified crown that picks up in the front and wraps the back. It is lovely! I need to start doing some hair tuts ;)


As a footnote, a tiny bit of linguistics.  I have called my inspiration "scandinavian" throughout.  But as I began to finish dresses, my husband, who lived in Switzerland for a year, asked if I had designed them to make him nostalgic for the Swiss.  I've had others compliment me on the adorable Austrian outfits.  Others asked about my Nordic designs.  Which left me thoroughly confused and curious.  For Germany, Austria, Switzerland I finally found a word that pulls them all together: Alpine.  But I'm still really confused and not sure if my dresses are Scandinavian, Nordic or Alpine - all I know is my girls love them & look cute in them!
A dear friend of mine told me that with me there's always a story behind everything in my life.  I guess that's true, since I follow other craft and sewing blogs, and they seem able to just give a straight forward tutorial or "look what I made" inspirational post without going into some crazy insane backstory about the whos and whats and wherefores that made this a particularly interesting project. (and EVERY project, no matter how mundane it starts out, turns into a particularly interesting project with me! Seriously, WHY?!) So it's not surprising that this sewing project, while appearing to be simple, has yet another back-story as well :)

First off, this isn't just an average dress.  It's Chloe's baptism dress.  (I don't know if I have any readers unfamiliar with LDS religion, but at age 8 a child is old enough to make a decision to be baptized.  Girls aren't actually baptized in the dress - they wear a
white outfit for that ceremony - but it's traditional to get a new dress to wear for the accompanying celebrations). Since I usually make my girls' dresses in sets of coordinated threes, it is unusual for me to make a dress in the singular.  So I make it a special occasion and allow the daughter in question to choose her own style, fabric, etc.  It's supposed to be a bonding mother-daughter experience worthy of a few gorgeous scrapbook pages - instead, it's a NIGHTMARE!!! With my older daughter, we spent HOURS at the fabric store while I tried to hold on to every shred of patience and she picked out everything from fleece to upholstery and ignored my suggestions - reveling in her power to choose it herself.  With Chloe, who is a total fashionista, I thought we'd have an easier time.  I was wrong.  Knowing that most of the little girls lately have been going for fru-fru prom-dress looking fancy-shmansy at their baptisms, I was prepared with patterns & steered Chloe right to the dressy fabric section.  It was a NO GO.

"Mom, you know, what I really love are dogs and puppies.  I'd love a dress with dogs and puppies on it."

Frankly, the thought of Chloe sitting next to the tiny prom girls at the church in a dog-covered getup actually intrigued the mischievous side of me.  I got many private giggles over the image of it.  But of course I said it wasn't going to happen.

"OK.  I really like polka dots..."

I could do polka dots.  Polka dots are adorable.

"...and stripes together.  Pink and blue and yellow!"

Did I say she was a fashionista, or did I mean she thinks she's a clown?

Finally she came home from school one day after an assembly with Chinese dancers with the idea for a Chinese styled dress.  As she is in a Chinese Immersion program at school and is very proud of speaking Chinese, this seemed a perfect opportunity to do something uniquely Chloe.  The search for fabric was ON!  All I wanted was something soft colored, feminine, and young.  We looked at every brocade and silk we could find.  Chloe found exactly what SHE wanted - RED.  Chinese red with bamboo and pinyin characters.  Again we had a battle on our hands.  I couldn't figure out exactly why I didn't want what she wanted until I realized that I didn't want to make a costume, I wanted to make a dress.  I was great with Chinese inspired, just not with a Chinese historical costume.

We finally ended up with fabric (just a white-on-white cotton, no brocade to be found), only to discover that there was NO pattern.  Anywhere.  Not even in Halloween costumes that have Japanese


Kimonos but nothing with a mandarin collar.  I had Simplicity 3588, but it doesn't actually open in front; it's a false look-alike.  Chloe didn't like that it has a bodice and skirt section and wanted a solid dress, didn't like the puffy sleeve, and didn't want a zipper splitting the collar in the back.  I found a rough drawing with instructions IN CHINESE online, and combined it with 3588 + Simplicity 3866 for the shape of the bottom half based on pictures we looked at online, plus the sleeve from Simplicity 4627 - the only fitted sleeve I could find that had no puff to it.  At one point in cutting out, I had three pattern pieces and a printed off Chinese pattern all pinned together to get the one dress piece I needed :-O

I barely started tacking it together before I realized it was totally, completely see-through.  Put a white slip underneath? Lose the white-on-white pattern!  Solution?  Line the whole dress in tan.  But when it kicks up, the tan looks shocking and bad underneath in contrast.  Solution?  Line the tan in white. Crazy? - yep, I'm certifiable.  Three stupid layers just to get the thing to work.  This simple looking dress turned out to be one of the most difficult things I've EVER sewn.  Tailored sleeves, that collar that took 7 attempts to get it in correctly, trying to figure it all out with only Chinese instructions!  Let's just say that my seam-ripper got LOTS of work with this project ;-)
I so rarely catch her looking right into the camera!  I love those blue eyes!
 She picked the pink bias trim, and I happened to already have a pink frog closure, my one great serendipity!

But it's all worth it when I see the results and how much she loves it!  I'm still surprised that she was so confident in her simple, tailored lines, next to satin & bows, but I love that so much about her. To top it all off, I stopped in to an Asian specialty store and bought the silver blossom hair comb.  Since she so rarely has anything in her short hair, it made it super-special to have a sparkly "do".

I have one more daughter left to turn 8.  Will I let her design her own dress?  Let's just hope time erases trauma by then ;-)

There's even a little story here.  Yes, Chloe's hair looks a little like she stuck her finger in a light socket.  Her idea was for me to put it in curlers the night before so it would be all curly.  Then it would be straight after her baptism.  I'm not sure how she came up with the idea, but I don't know where any of Chloe's ideas come from! What she said was, "I'll go into the water looking like one person and come out looking like a whole different person!  Just like I'll feel inside."  Except I put in the wrong curlers and instead of gorgeous, she had frizz.  It made me sad, and she kept bouncing up and down telling people that her mom had made her look like a clown, but it accomplished her purpose, so I guess that's what matters.  I adore that crazy Chloe.

Wearing Easter dresses everywhere was getting a little old.  The girls were in need of alternate outfits, and I had a large piece of pink knit fabric in my "no idea when or where this came from" pile that I'd been itching to use.

What I love most about sewing for my girls is that I can coordinate them yet design for each of their personalities and body types.  It gives me so much joy to think about what would compliment each girl individually, then try to dovetail those designs with an overall concept.

Grecian Ombre Maxi-dress
My oldest is tall - the tallest girl in her 5th grade class!  Putting her in a long maxi-dress that emphasizes her tall, thin figure was just too tempting.  For her, then, the concept was Grecian.  I used a pajama pattern, actually - Simplicity 4767, view A.
 I increased the length and instead of gathering the sleeves in, I cut them a bit shorter, did a tiny rolled hem and left them open - creating a ruffle-like sleeve instead of the puffed peasant sleeve.  I also did a bit of a smocking-like waist instead of making a casing.  By using a thick elastic thread and a narrow zig-zag stitch, I made the first line at the place I wanted the waist; adding more until it was the desired width.


I'll get to the ombre dyeing later, but I also added the embellishment of ombre knit flowers made from the same fabric as the dress.  These are super simple.
Cut flower shapes - they can be pretty messy and random because as they are sewn to the dress, they are gathered and scrunched to give them dimension.  I actually made way too many and couldn't figure out what I didn't like about her dress the first time she wore it.  Then a few of the flowers started falling off due to some bad quality thread and I found that I liked it better!  I took some more off, re-positioned the rest and loved the result.  MORE is not always better!

For a Grecian dress, I designed a Grecian braid.  Anyone interested in a tutorial?

Designer Ruffle Ombre Maxi-dress
Most of the time I end up loving all of the dresses equally but for different reasons, but this time, this dress is my favorite of the three!  The concept behind this dress came from the idea of making the skinniest maxi-dress possible for this tiny pixie-girl.  Instead of a pattern, I used a tshirt of hers which fit the way I wanted as a guide.

Extrapolating the shape of the rest of the skirt from where the shirt ended, I ended up with a v-neck design tight through the waist and flaring slightly through to the floor.


But the true joy is in the ruffles embellishing the front of the dress.


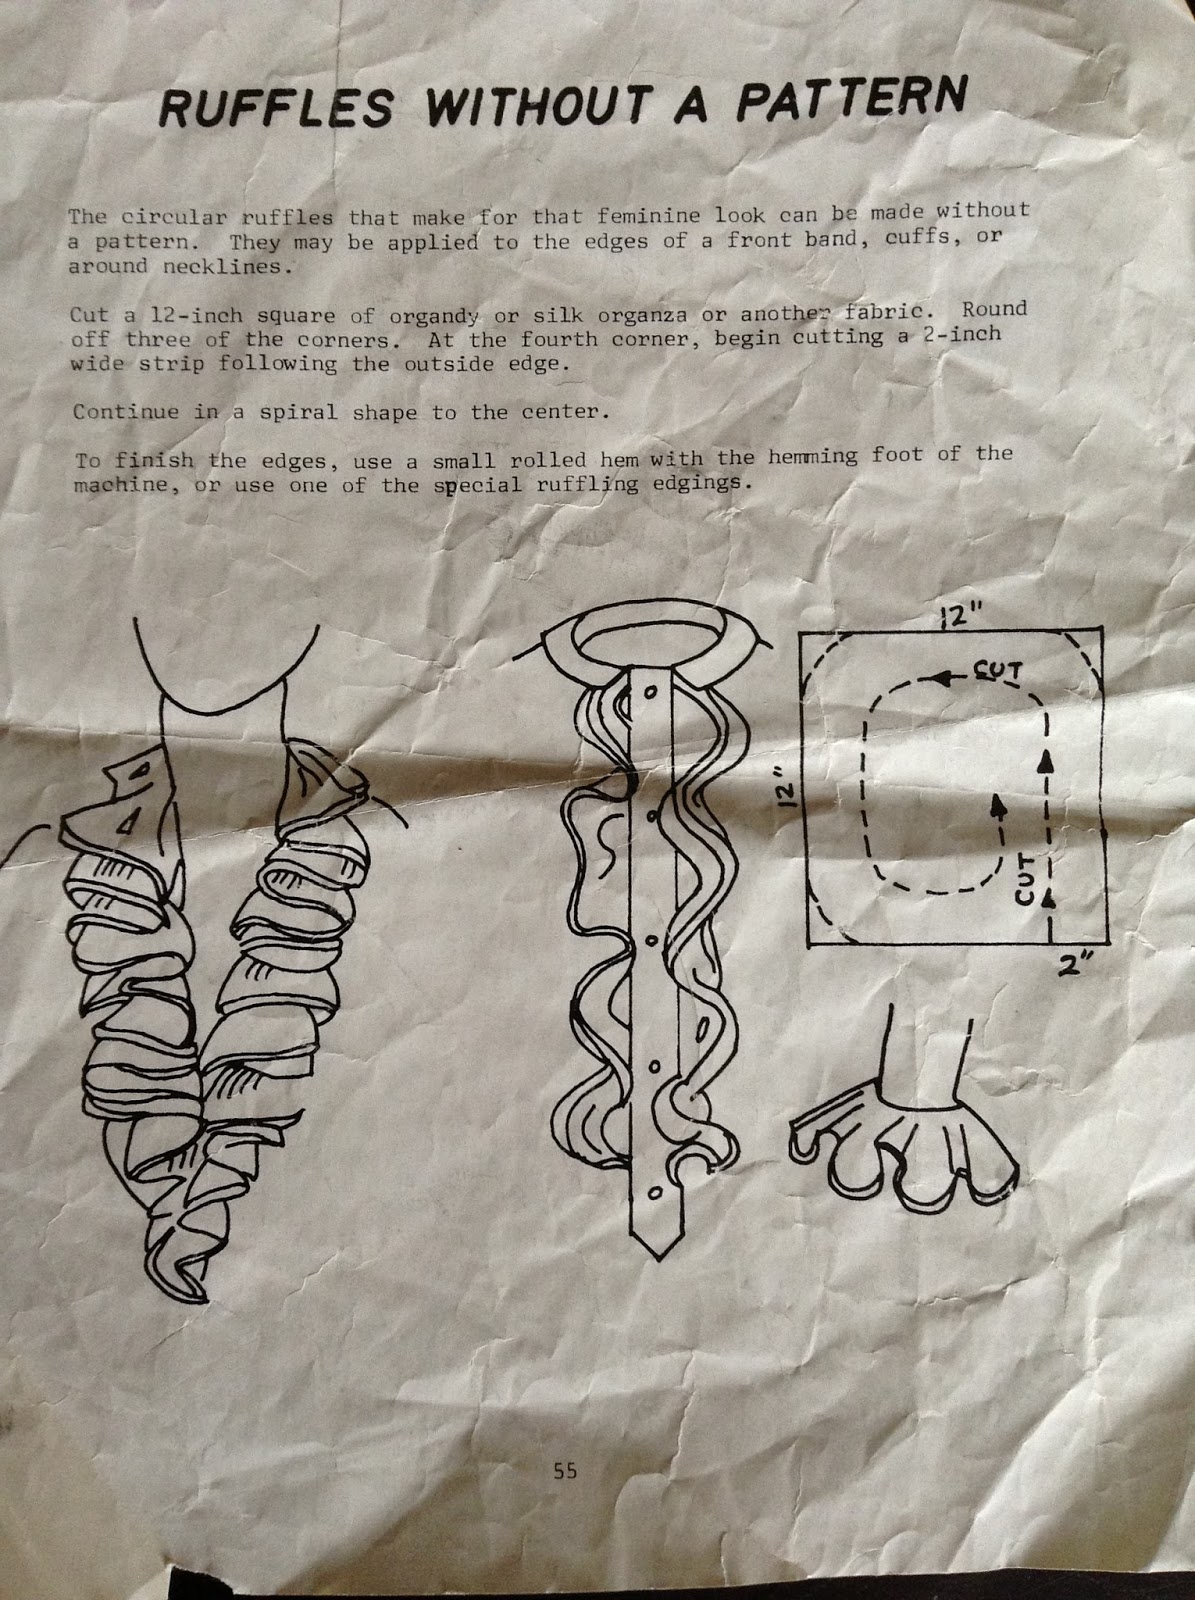
I knew what I wanted to do here when I found this instructional guide among a box of random interesting stuff my grandma gave me years ago and I've been just recently going through a bit at a time.
 Following the instructions, I cut squares in various sizes from the pink fabric, then cut the spirals through to the center.  This made 5 ruffles, all different lengths.


 Ombre dyeing them as well, I sewed them to the dress - taking a tiny seam allowance.  No need to hem the ruffles - the knit fabric shouldn't fray.  The perfectionist in me had a bit of a struggle not making the ruffles symmetrical, but my vision was for an organic look - almost like the ruffles were vines that had grown down the dress - and symmetry would not have served.  Still, it was VERY difficult for me to allow the random design to evolve on its own.  I LOVE, love the result though, so repressing my impulses paid off :)


Butterfly Maxi-dress
Honestly, the intention was to have all three girls in the pink knit fabric.  I ran out.  I realized I would run out and almost stopped making the dresses after the first dress, but then I dug through my random fabric and found this piece of pink and purple butterfly knit.  I didn't love it as well initially, but it did look younger for my cute little Evey, and the pink was an exact match with the other girls', so I threw it into the mix. Seeing the two fabrics together on the floor though hatched a brilliant idea (or maybe more just a crazy idea), of ombre dyeing the pink dresses purple to coordinate even more with the purple and pink butterfly dress.  I'm not sure that it worked, since I never achieved the bright purple I thought I'd get, but I'm still glad I dyed them, and I just love the butterflies on Evey.


Back to the butterfly dress .  For this dress I used Simplicity 5695, and combined views to get the desired result.  I did shorten the sleeve a little to get more of a cap-sleeve.  Then I took a couple of butterflies, backed them with pink knit, and sewed them on through the center of the butterflies as a dimensional appliqué.


Ombre Dyeing
I started off my ombre experiment by following the ombre dyeing instructions on the RIT dye website.  More or less.  I didn't wrap my dresses around a pole, and I didn't dye to the top of the dress - just the bottom.
Plus I kept mine moving a lot more - not wanting a distinct line.  I also tried dyeing the flowers and the ruffles.  It was a fun process and I gathered quite an audience!
 It took longer than I expected, made a bit of a mess (NOTE: Do not hang dyed dresses to dry on vinyl fence or railing - even after they have been rinsed.  Unless they've been thoroughly washed, they still have dye in them and WILL dye ivory vinyl PURPLE!!)

My first dye job was a failure :(  I was so excited by how the dresses looked.  The Grecian dress was finished except for the flowers, the ruffle dress wasn't anywhere near finished, since I had to individually dye each ruffle and the sleeve ruffles before sewing them on, but I could still see how gorgeous they were going to be.  I followed the instructions - rinsed in cold, then in warm, then washed in the washing machine.  All the dye came out.  Almost all the dye. Enough stayed in to make the pink dresses look dirty, like they had been in the mud.  I was SO upset!  I was ready to sew on the ruffles and have the girls wear them to church the next day!  Alas, it was not to be.

But if at first you don't succeed, dye, dye again.  With a second packet of RIT, this time I followed the instructions on the box, boiling the water.  This process wasn't quite so fun.  Working over boiling water was hot and sweaty, especially as I employed dip-dye techniques of keeping the fabric moving almost constantly to avoid lines of dye.  Plus these instructions double the ombre instruction dye time - so it takes twice as long!  But it WORKED!!
Hanging them to dry in a safe place, then washing them according to instructions, I was so excited with the results!  There are distinct lines in a couple of spots, and the purple still is darker, more plum than I initially hoped, but I still think the dresses are elegant!

First Attempt Dyeing Flowers: Wicking
Second Attempt Dyeing Flowers: Tie-Dye
Note on dyeing the flowers and ruffles.  My first attempt used wicking as the ombre concept.  I tried clothespins and dipped the tips of flowers and ruffles in the dye.  Didn't work.  They wicked dye completely saturating and just ended up purple.  Second attempt tried the idea of tie-dye.  I wrapped the centers of the flowers and insides of ruffles in cling-wrap and secured it with rubber bands.  This worked really well!  To emphasize the effect, however, and make it even more dramatic, I mixed a bit of fabric paint with water and brushed the very edges of the flowers and ruffles - letting the paint wick towards the center and leave a more distinct edge.


© 2012. Design by Main-Blogger - Blogger Template and Blogging Stuff