Today I'm attempting to cover Thanksgiving this weekend before it morphs completely into Christmas.  I adore fall at my house because I am a total earth-tone chick and as soon as stores start putting out autumn decor, I salivate.  I don't decorate for ever holiday, but I cannot get enough fall leaves, gourds and pumpkins!  Just so beautiful!

This fall I've had a bit of a turkey thing going on.  First off, I've had a new church calling.  I now am the primary chorister - so I created my friend Tom the turkey.  Oh, I did NOT sew this adorable turkey!! I bought him at Hobby Lobby.  But then I created a disguise for him.  For each song the kids learned and/or sang well, they earned Tom a new piece of his disguise, with the goal being to get him unrecognizable by Thanksgiving so Farmer Brown wouldn't be able to find him.  Disguise pieces?  A wig (I made this of craft doll hair),  glasses (courtesy of our Ms. Potato Head + googlie eyes for silliness factor), tutu (just sewn on an elastic band - super easy), boots (using a doll clothes pattern), a necktie (felt, I didn't feel like interfacing a turkey tie), and a sombrero (doll straw hat + rickrack with beads hand-sewn to each peak).  So much fun!  I giggled the whole time I was sewing the stupid tutu just thinking about how ridiculous the concept of a turkey tutu is!


 If there is one craft item that makes my husband crazy, it's glitter.  I usually try to avoid using it, in any form, just to be courteous.  But it couldn't last forever.  Into all crafters' lives, a little glitter must come.   Glitter, all sparkly and shiny fits in perfectly with the fireworks of Independence Day.


Goal: a craft that was 4th of July related, easy for all ages, easy for me, and fun for the kids to play with.  What kid doesn't love a good wand?
   
Materials: a package of 6" fun foam stars in red, white, and blue (pre-cut all the way, baby! sorry I forgot to include them in the picture), 12" dowels,  spools of 1/4" red, blue, and silver ribbon, felt star stickers, glitter, glue dots.  


Cutting the ribbon to 16" lengths, then tying it about middle makes perfect streamers, which need a dab of glue (E6000 is my favorite) to stay put. 


Then I ran into a snag.  When I glued the stars directly to the dowels, the foam was thin enough that the dowel tip would push a hole right through.  So I scrounged up some batting bits and wrapped them around the dowel tips to soften the edges.  This was quite the serendipity because I inadvertently ended up with slightly puffy stars, which was cute.  Glued 2 different colors back to back and pressed under some books until the glue dried.  I kept thinking I should just use hot glue, but I've had a bit of bad luck with hot glue melting fun foam, so I've become gun-shy.  It sure would have been easier though.

Now so far, pretty standard stuff.  The wands are all constructed and ready for kids to decorate, and the felt star stickers were perfect, but it wasn't quite crafty enough to just slap on some stickers. I wanted more creativity.  
Enter the glitter.  


The original plan was the classic glue, sprinkled with glitter routine.  But I needed it to dry faster - I wanted instant play.  And since I was using this both for my 3 year old Sunbeam class and my kids and their cousins, I needed less mess.  I decided to experiment with glue dots.  I know that they stay tacky for, basically, eternity, so I didn't know if they'd work, but they did.  They reach a saturation point where there is so much glitter that there is no exposed stickiness.  And the bonus?  They make the most perfect, round polka dots!  I used a paper plate with blue, one with white, and one with red, two different diameters of glue dots, and just let the kids go crazy.  (A little too crazy for the littlest ones who ended up with more glitter on them than on their stars.)


I was totally pleased with the results.  Even the littlest toddler niece was able to push the glitter onto the dots, which made her just tickled.  Every star ended up adorable, but completely unique.  Some kids are planners and measurers, others are random.  Now that I know about glue-dot polka-dots, I'm excited about the possibilities!
Pin It
 As always, I got myself a little out of control with this project.   It all started with this little package of necklace charms.  That's all it took.  I saw them and I thought "Mother's Day silhouette project for my class!" Lucky for me, the charms went on sale the next week, and I was off and running.


Making silhouettes is a little time-consuming, but fairly easy in photoshop.  I took pictures of each of the children in profile.  Knowing that I was doing silhouettes, I chose either the white wall as a background, or the window - and it helped when I remembered to set my camera to not use a flash.   My sister, Natalie, sent me a fantastic link that made it go even quicker, since her technique is more efficient than what I had planned.  http://craftingchicks.blogspot.com/2010/04/silhouettes-for-mothers-day.html

They turned out beautifully!  In fact, it made me a little sad to shrink them to the tiny size to fit in the charms, because they look so fun bigger.  But as the entire point was the charms.....

Here is a before and after of one of my darling little sunbeams, and another cute one - I love the hair.

With the silhouettes figured out, I moved on to the necklace itself.  Here is the summary of my goals for this project:
  • The kids do as much as possible themselves.  (The lesson title that week was "I am thankful for my hands" - so a "hand"made gift was the biggest emphasis)
  • A pretty final product.  Something that could actually be worn on days other than Mother's Day when the average fashonista Mom can be seen to sport a fruit-loop necklace.
Not too tall of an order, eh?  A beaded necklace with pretty beads seemed to fit the bill.  I did some research and was intrigued by the couture textile necklace trend, that uses ribbon and other fabric objects to make jewelry.  Ribbon was the perfect base for little hands to thread.  I found this picture as my inspiration.  Lovely, eh?  Though I decided on a clasp instead of a bow - more secure for a mom with toddlers tugging on the necklace. I figured out how to add the clasp by looking at the picture below.


I ran into my big problem next.  I could not find beads with big enough holes for three and four year olds to thread, that looked like anything classy, AND that didn't cost at least $5 per bead.  I'm on a budget here, despite my big ideas :-)  So what do I do whenever I encounter something I can't find in a store?  I figure out how to make it myself.  Once I accepted that this was what I'd have to do, I was actually really excited because having the kids not only string the beads, but make them themselves would be even more meaningful!

After online research and a half dozen library books on bead making, I settled on polymer clay.  If the kids wrapped the clay around knitting needles, the holes would be perfect size.  I bought a Studio by Sculpey in a really nice blue, and a silver (another Sculpey, but I can't remember the specific name)

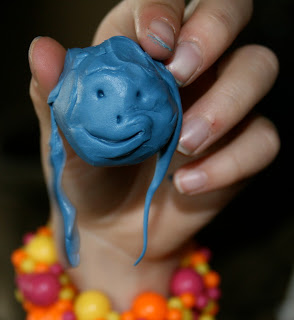
The first step in working with polymer clay is to work it until it is soft enough.  Some books and websites suggest putting it in a food processor or a pasta machine.  I divided it into chunks and gave it to my own kids!  They played for over an hour, making sculptures - like this one that Lily made of me (perfect likeness, I think!), and rolling different objects on it to make textures.  It was  a blast!!  When they were done, I took a chunk of blue and rolled it flat with my rolling pin covered in peel-and-stick so the clay wouldn't get on it. I alternated layers of silver and blue until I had one big flat slab.  Then I cut the slab into squares and rolled them loosely into balls that would each make a reasonable size bead.  This prep was so that the kids would be able to grab one, make it whatever shape they wanted around the knitting needle, and still end up with relatively uniform beads.  By rolling the layered clay, I achieved the marble effect I was after.


The class had so much fun with the bead making!  It was adorable to see how they giggled and enjoyed the clay.  Except things didn't turn out exactly as planned.  A couple of them grasped the concept, and made roundish beads from their balls of clay.  The rest squished it all into one mass along the needle.  I thought I would take it all off and do them myself, but then I decided that it could be salvaged.  I squished down the biggest lumps so that the beads wouldn't be too thick and heavy, then I just cut the clay stick into sections to make barrel beads.  They have great personality because they aren't uniform - but they're classy enough that they don't necessarily look like stereotypical kid-made beads.  Bake according to the directions on the clay.

Finishing up the beads with a nice couple layers of a high gloss clay glaze, I was pleased with the results.


Pre-cut the ribbon before class, and add the crimp thingies onto the ends to give a nice stiff tip for the kids to thread through the beads.  We spent most of class threading beads, then, as the children decorated cards, I attached the clasps using jump rings.  We wrapped our gifts and took them home to (hopefully) pleased moms!


One more finishing touch, to make sure the moms knew that the kids had made the necklaces themselves (except for the silhouette charms), I wrote a silly little poem that went with the "I am thankful for hands," lesson theme.  Here's the poem.  I hope all the mothers out there had a fantastic day!!  I sure did!!


My hands turn the pages
While your hands hold the book
My hands reach for something high
Yours lift me up for a better look

My hands hold the rope
Your hands push the swing
My hands get scraped up
Your hands soothe the sting

Your hands do so much for me
They clean, they cook, they play
They hold my hand to cross the street
They show me how to pray

Once, around one of your fingers
My tiny hand could barely cling
Now I'm growing bigger
My hands can do so many things!

I'm thankful for my hands
So I could make this gift for you
And my hands will show I care
With the helpful things I'll do

For all the things your hands 
Do for me each and every day
I love you, Mommy, and
I say, "Happy Mother's Day!"

Footnote:  This morning I found this post and wondered if maybe I over-obsess about things.  This necklace craft uses clay kid-made beads, and it is adorable.  Hmmm 

I've recently been inspired by all of the craft blogs I've followed with ideas for re-using all sorts of worn-out items.  I'm fascinated by the messenger bags made out of cargo pants that don't fit any more and knee socks that once used to be cotton tights, before the knees (as they always do) got holes in them.  Brilliant!
My first re-use project isn't very creative or original, but it's a start!  Lily is the worst of my kids at ripping the knees out of her jeans - even her brothers aren't as hard on their clothes.  I don't know if she has a pair of pants without at least one hole.  So, with the weather turning warm, I'm ecstatic to get rid of the hobo look Lily has mastered by converting her ratty pants into fresh shorts.  I combined the classic idea of cut-offs with my recent obsession with my ruffler foot and a deep seated love of eyelet, and voila.  Ruffle shorts.

 I cut the jeans off at the desired length, just zig-zagged the raw edge, and then added two layers of eyelet.  The longer, roughly 2" eyelet is the bottom ruffle, sewed on 1"from the bottom of each leg.  That way it completely covers the zig-zagged edge, but doesn't add too much to the length.  I then used a smaller 1" eyelet to add a second tier.  Simple, but Lily loves them and they're pretty cute on.  She says it's like having a tutu on each leg.

For the second pair of cutoffs, we decided to go with some color.  Lily picked out some trim (the polka-dot rick rack - great choice!) and I coordinated a couple of ribbons.  This pair had to be hemmed, rather than just having the edge zigzagged, since it isn't hidden the way the lace hides the edge in the first pair.

I LOVE the way they turned out!  I have a total love affair with rick rack and grosgrain ribbon.  Now you know my secret passions - eyelet, rickrack and grosgrain - any project with these and you can't go wrong!
Lily wanted a pony birthday last week.  Not My Little Pony, not Disney Princesses with ponies, not even cowgirl - just straight up ponies.  It is quite a tall order these days to find any sort of decor that isn't a brand, so I had to resort to using my very own hands and brains.  I had already thought about a version of the mobile-garland thing I'd made for the baby shower last month, so I proceeded to do that.  Then I wanted a matching birthday banner and discovered a perfect placement for it between the hanging lights over my bar in the kitchen.  Since we haven't been in the house long, I'm still figuring out the best locations for decor for all occasions, so it gave me more than a little joy to have a banner spot established.

For both the garland and the banner I used double sided cardstock in brown & pink patterns.  I found a couple of horse pics online and printed them out to use as patterns.  A friend of mine saw the finished product and complimented my cute cricut cartridges, and she was scandalized when I explained that I don't have a cricut.  I traced with pencil and cut with scissors each little horse and all the other shapes - old school.  I wanted it girlie, so in addition to the logical horseshoe patterns, I added flowers.
I meant to take more process pictures this time, but forgot - oops.  The garland is constructed by using a needle and thread to sew each shape to the next, knotting the thread at the top and bottom of the shapes.  Then the string of shapes is sewn to the ribbon.  Construct another string of shapes and attach it to the ribbon about four to six inches over.  Keep doing this until the desired length is achieved.  I find it looks better to keep the lengths random rather than all the same.  It moves better in the air current, and it looks more aesthetically pleasing.  This one was made rather quickly, and there are things I'd change if I went back and did it again, but it worked well all in all.  I tried that green sticky mounting clay stuff instead of scotch tape this time, and I used ribbon that matched my paint rather than bright white, so the base was more subtle.

For the banner, I printed out the letters spelling out Happy Birthday, using a hollow font so I'd just get the outline, and fitting four letters to a page.  I mixed up brown and pink cardstock so the letters would end up random, and I printed it out twice.  Why twice, you may ask?  Because I'm crazy!  If you look closely at the pictures, you will notice that there are actually two different versions of the banner.   When I started planning the banner, I realized that since my kitchen faces the family room and dinning room, there would be a large amount of living space looking at the back of the banner.  So I made it double sided.  Since the cardstock was already printed on two sides, I simply cut out two sets of letters, double-stick taped them to an appropriate background print, then figured out which letter would go on the back. (Yeah, I admit that it took me more than a little time working that out, since if I put an H on back of the H and a P on back of the P one banner would end up backwards.  It bent my mind a bit working it all out - especially because the print on the back is different than the one on the front, and the color of the back letter sometimes didn't work with the background I'd chosen for the front letter.  It got wicked complicated for what seemed a simple plan.)  Two holes punched at the top corner of each card allows a thin 1/4" ribbon to be run through and knotted at each hole to keep the letters in place.  I added a rearing pony on each side of "Happy," to tie in the theme, by sewing it on with thread like the mobile banner.   And it said Happy Birthday wether you were getting a drink from the fridge, sitting at the table, or watching TV :-)
Voila!  Pony birthday!  Still not sure if it equals Isaac's Transformers birthday that was less papercrafting but more impressive Photoshop fun, but it made Lily very happy, and that is the entire point.
I've heard it said that the first step to recovery is recognition that there is a problem.  So I'm formally recognizing here that I have a problem with perfectionistic tendencies to an idiotic extent.  :-)  Remember the pettiskirts I made for Easter?  Well, I wasn't totally happy with Chloe's.  The fabric I used for the waistband section was tricot.  I thought it would be perfect because the color was exactly right and it is shiny, similar to the satin on the other girls' skirts.  But it flopped.  It didn't have enough body.  It irritated me.  Also, since I was pushing the Easter deadline when I originally made it, I got a little skimpy with the ruffles to save time.  All in all, every time the girls wore them together, Chloe's looked pathetic to me, even though it's likely that no one else ever noticed a difference.

So, I took Chloe's skirt apart and re-did it.  I got some satin instead of the tricot.  I constructed an extra layer of the skirt (two tiers & ruffle fluff).  I sewed the whole thing back together.  Yup, I'm crazy - certifiable. But check out the before and after pictures.  It was SO worth it!  And now I can put the skirts on all three girls and be filled with nothing but joy at them - no regrets.


How much fun does this look like?!  Pettiskirts are made for swinging!!  Almost better than capes!

I totally blame my perfectionist problem on my Mom and talented sisters.  I'm not the only crazy one.  Notice the gorgeous sweater that Lily is wearing - that is the handiwork of my amazing mother!  And the adorable crochet barrettes were made to match the skirts by my uber-creative sister, Natalie.  Look what I have to measure up to!!
An update on a previous blog entry, Seth won first prize for his ladybug planter in the 3rd-6th grade category!!  Poetically, the first place prize is a little planter box, seeds, and garden hand tools!  How funny is that?  Winning a planter by making a planter?  Love it.
Pin It
I had a bit of difficulty coming up with an Adam and Eve craft for the Sunbeam class last week.  Most online suggestions revolved around making snakes, which isn't the direction I wanted to go since the lesson was more of the sixth day of creation than the account in detail.  Finally, I found these hilarious little people shaped craft sticks at Hobby Lobby.  I bought some pipe-cleaners (oops, I mean chenille stems - gotta stay up on the terms), and some felt for clothes.  If I had given it some more thought, I probably would have grabbed googlie eyes too to save myself some work, but instead I painted the faces on.  E6000 attached the chenille-stem hair.  I designed and cut out felt clothes (the cheetah print just made me giggle - though Lily was disappointed that I didn't get the hot-pink cheetah print for Eve.  It would have given her a whole new image though LOL!). Double-stick tape on the back of the clothes meant that the kids got to dress their own Adam and Eve.

After I was done with the puppet-stick dolls, I wanted a puppet theater of sorts for them, so I found a coloring page online (it was actually a My Little Pony scene, and I just photo-shopped out the ponies).  I selected and copied the bottom half of the picture, and modified it to give it some shape along the top for bushes, then stretched it just about half an inch bigger than the original.  This way, when I staple it on both sides, it is a little bigger than the underneath scene and so it bows out and creates a space in between for Adam and Eve to walk around in.  When I demonstrated this for the kids, using a deep voice for Adam, saying, "Hi Eve, how are you today?" the Sunbeams looked at me like I had completely lost my mind.  Totally cracked me up!  But they got the idea and had a great time dressing their puppets, coloring the scenery, and playing out scenarios.  I love it when I start out totally clueless, with no ideas and no plans, and then something finally comes together and turns out fun.  I adore these little people-shaped craft sticks too.  So many possibilities! I'm thinking princes and princesses - fairies - all sorts of characters will soon be performing puppet shows at our house!

(P.S. My older kids helped me out and colored the scenery in the pic.  The 3 & 4 year olds' pictures turned out a bit more, um, abstract)
 For Earth day, my kids' school challenged the students to come up with projects using recycled items.  Seth spent a lot of time brainstorming - favoring ideas that would have made NASA proud, but were a great stress to me because of how complicated (and not likely to be anything but a big mess) they were.  I told him to simplify a bit - especially because, as usual, he had waited until the last minute to do the project - and he came up with a planter box.  He used a Hawaiian Punch bottle, and his Dad helped him cut a rectangle out of the side.  He GENEROUSLY spray-painted his planter to look like a ladybug.  I love the face he drew on the lid.  Craft sticks are the legs - which serve the purpose of keeping the whole thing from rolling over on its side.  After picking out and planting his plants, he finished barely in time.  He's pretty proud of his buggy bottle planter.
Just a quick little funny decoration I made for a baby shower at my house.  I wanted something to accentuate the tall double arches in my entry hallway.  I cut three different sized circles from double-sided card stock, cut daisies from white with centers from the same cardstock as the circles. I then connected the circles and daisies in random ordering using a needle and thread.  I sewed a hole in the top of the circle, knotted the thread, let the thread run down the length of the circle before poking another hole in the bottom and knotting it again, and then repeating the process to attach subsequent shapes.  Each strand of circles and flowers was sewn to a strip of grosgrain ribbon, to create the garland.

I was really pleased with the way it turned out.  It was in constant, gentle motion and looked very sweet.  I had only two issues.  First, I attached the ribbon to the arch with scotch tape, which looked really tacky - as you can see clearly in the photo.  If I hadn't been pressed for time, I would have run to the store for some removable double stick tape so that it didn't show.  Second, I cut out enough to do both arches, but ran out of assembly time.  It took A LOT longer to put together than I anticipated.  Otherwise, I think it was so much fun that I'm inspired to repeat it with variations for other events.  Hmmmmm, Lily's birthday is coming up....she wants a horse theme birthday.....oh the possibilities.
 
© 2012. Design by Main-Blogger - Blogger Template and Blogging Stuff