Just a quick little funny decoration I made for a baby shower at my house.  I wanted something to accentuate the tall double arches in my entry hallway.  I cut three different sized circles from double-sided card stock, cut daisies from white with centers from the same cardstock as the circles. I then connected the circles and daisies in random ordering using a needle and thread.  I sewed a hole in the top of the circle, knotted the thread, let the thread run down the length of the circle before poking another hole in the bottom and knotting it again, and then repeating the process to attach subsequent shapes.  Each strand of circles and flowers was sewn to a strip of grosgrain ribbon, to create the garland.

I was really pleased with the way it turned out.  It was in constant, gentle motion and looked very sweet.  I had only two issues.  First, I attached the ribbon to the arch with scotch tape, which looked really tacky - as you can see clearly in the photo.  If I hadn't been pressed for time, I would have run to the store for some removable double stick tape so that it didn't show.  Second, I cut out enough to do both arches, but ran out of assembly time.  It took A LOT longer to put together than I anticipated.  Otherwise, I think it was so much fun that I'm inspired to repeat it with variations for other events.  Hmmmmm, Lily's birthday is coming up....she wants a horse theme birthday.....oh the possibilities.
Last week's Sunbeam lesson was, "I am thankful for Birds and Bugs."  There were too many ideas for my brain to even cope with!!  Bugs made of beads, bugs made of milk-bottle lids, feathers and all sorts of fun.  I had a list of crafts and games a couple of pages long - both internet inspired and self-inspired.  For the craft project, I settled finally on doing some sort of bird feeder, so that, hopefully, the kids would be able to see some real birds sometime in the week after learning about them.  Finding a birdfeeder craft idea for preschoolers though - one that didn't involve lots of drilling of holes and adult assembly so that there wasn't much for the kids to do themselves - proved challenging.

One idea was to smear peanut-butter on a pinecone and then roll it in birdseed.  My kids made these at one point, and the birds loved them.  But in my mind's eye all I could see was peanut-butter covered toddlers and angry parents!  The second idea was to string round cereal on a pipe-cleaner and hang it in the trees.  I liked the stringing concept, but wanted something a little more appealing than a straight line.  So I decided on a triangle shaped feeder - with a straw at the bottom as a perch - and cereal strung on either side all the way up.  I had to glue the straw in the middle to keep it from slipping around, but that turned out to be a fantastic move because it stopped the cereal at the bottom so there were no worries about it falling off.  The kids loved making them - eating more of the multi-grain Cheerios than they strung!  Of course, my own kids wanted to make some too, so the pics are of my kids and their cousins making their own birdfeeders.  The birds around our house are well taken care of :-)
Pin It For the bug section of the lesson, my class played a game with riddles about bugs and talked about helpful bugs and dangerous bugs.  I found a fantastic picture of a butterfly drinking from a flower with its long, straw-like mouth, and came up with the idea to have the kids drink like butterflies.  I printed off a simple flower pattern, cut it out, punched a small hole in the center, and stapled it to a capri-sun with the hole in the flower leaving the capri-sun straw hole exposed.  This worked great because I was able to leave the straws covered and attached to each drink, so it was all sanitary and self-contained.  I think that kids always enjoy a capri-sun, but this time, drinking like butterflies out of their flowers, they LOVED it!  I didn't anticipate just how much they would get a kick out of it - or how many giggles would result.

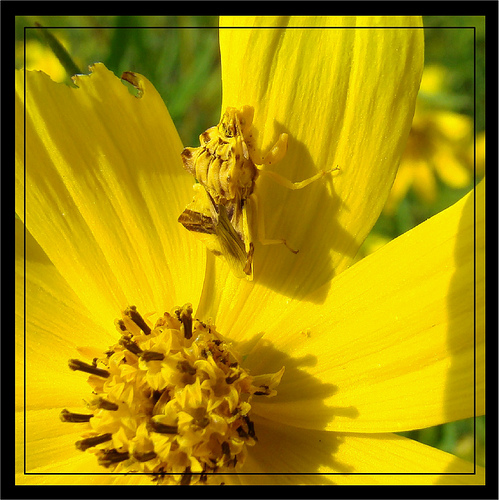
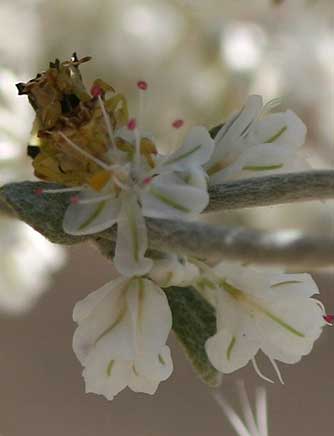
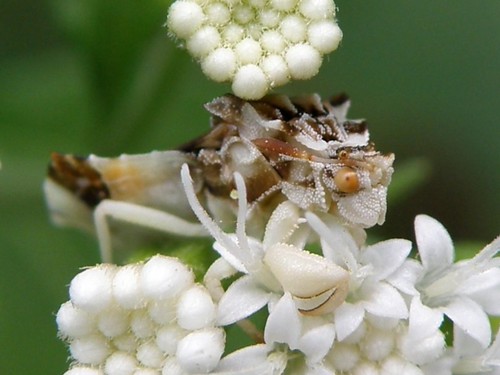
There was one crazy sideline from my lesson prep.  I discovered a new fascination.  I spent way too much time enthralled by pictures of Ambush Bugs.  While looking for great pictures of bugs and birds to show the kids (I've discovered the power of taking our laptop to show pictures, because then they aren't clipart versions, they are actual photos and the kids get really engaged), I was looking for pictures of stickbugs and katydids, and found these amazing Ambush Bugs.  I am so intrigued!!  One of these days that I have extra time on my hands (maybe when I'm 90) I have got to find out how these bugs end up looking the way they do.  Are specific ones always born on specific plants?  Or do they adapt as they grow to whatever flower they are living on?  Whatever happens, they are wicked cool, and further evidence of how teaching pre-schoolers can open our eyes to new things.   Can you find the bugs in the pictures?  Aren't they amazing?  I'm SO intrigued!!


http://www.flickr.com/photos/11770765@N06/3952446207/


http://www.flickr.com/photos/27214117@N07/2555059194/


http://www.bentler.us/eastern-washington/insects/ambush-bug.jpg


http://www.giffbeaton.com/2004-08-18_0036_ambush%20bug.jpg

http://farm3.static.flickr.com/2488/3925015924_9aebfdc451.jpg


While the debate rages on in scientific and philosophic circles about Nature vs. Nurture, I think that simple observation of a multiple-childhood household provides ample evidence of both.  Obviously children in similar environments will develop similar traits.  And what is the point of teaching them at all, if Nature determines development exclusively.  However, anyone who has more than one child, raised in the same household, knows that these little beings absolutely come pre-programmed with personality.  In this instance, my evidence comes from two of my children's reactions to the Disney movie, Tarzan.
When Lily watched Tarzan first, at about four or five years old, she was very emotional and upset by the gorillas' treatment of Tarzan.  Every time the "Daddy monkey" came on the screen, she would curl up and hide her eyes.  She asked me, her eyes brimming with tears, "why are they being so mean to Tarzan?  He can't help how he looks."  She ended up putting Tarzan in her least-favorite movie category, despite the happy ending. 

Fast forward a few years to last week, and now Chloe is watching Tarzan for the first time.   She also gets upset at the treatment Tarzan receives, but with completely different reason.  She says to me, "why are they making it look like the Daddy monkey is mean?  He's absolutely right - Tarzan is a human, and nothing he can do will ever change that."  Through the rest of the movie, she rolled her eyes and snorted at what, to her, was an illogical lie.  Tarzan couldn't be a gorilla.  It's the truth, why try to get around it?  And why should those who speak the truth be vilified?  Chloe put Tarzan in her least-favorite movie category too, mostly because of the happy ending.
How can two little girls raised in the same house have such opposite gut-reactions to the identical story-line?  Because Lily is Lily, and Chloe is Chloe. That's all I know.  I can't wait to see how their different outlooks play out as they grow up.  I see Lily as an artist, maybe a veterinarian, or a social worker - Chloe as a lawyer, a politician, or a princess.   Time will tell.
(For the record, Chloe did actually use the phrase, "absolutely right."  I giggled about that for quite a while.)


I promised more about projects with my ruffler foot, and here I am to deliver.  As with everything in my life though, there is a story as well, so sit back and enjoy.  Easter dresses are one of my favorite sewing projects (second only to Halloween Costumes).  I start thinking about them months in advance.  This year was no different.  But this year, because of General Conference, we didn't have church on Easter Sunday.  For some, that would be no big deal, but for me - a crazy tradition freak - all it meant was confusion because what then would the kids wear to Grandma June's house for the egg hunt?  That hunt always results in the most darling pictures, and I love when the kids look their best around all the relatives.  But white dress shoes to get scuffed and tights to get shredded, as they do every year, were definitely out.  I cast about for an idea for more casual outfits.


It is here in our story that I discovered pettiskirts.  I saw a little girl wearing one and my first thought was a wish that I were a little girl again so that I could wear one - followed closely by the next thought that I do have three little girls.  Yay!  But I absolutely HATE gathering, and I could see that it would be hellish to make, so I decided to *GASP* buy some.  Made some calls, found a store that carries them, went with Lily to pick some out, found out that they cost *GASP* $70 per skirt!!!  Alright, I can find them online for cheaper, right?  Slightly.  Try $50 per skirt.  OK then, back to making them.  Looked for some tutorials online (we'll come back to those), was intrigued by how the skirts are assembled, and decided to forge ahead and make my own.


First challenge: they take a TON of fabric!  Over ten yards per skirt.  Even at only $2 a yard, that is $20 for fabric that then requires time and effort to make it into a skirt.  And $2 a yard isn't likely.  I began to see why they are so expensive.


Second challenge: no place local carries the fabric the skirts are made out of.  It has to be Nylon chiffon, not polyester.  OK, order it online.  Even with shipping, it is still costing me less than $70 a skirt, right?  I found a website that actually sells the fabric on rolls in various widths so that I don't even have to cut all of the insane yardages of fabric into strips.  YAY!


Third challenge: I mis-figured.  I ordered less fabric than I needed, it actually takes EVEN MORE - but ordering more would mean shipping costs again, which would make them ridiculously expensive all over again.  So, instead, improvise.


Finally: still HATE to gather.  Solution: my new ruffler foot that made the whole thing possible!!


Evey's skirt went fine, but it was making hers that I realized that I would run up short on fabric.  For Lily's I tried skimping a little, and according to my math it was going to work just fine.  I was sharing some of the same fabric with Chloe's, and by reducing a tiny bit on both, I would have enough.  Only I didn't.  So at the very last minute, with two skirts made and one sad little Chloe, I tried calling every obscure fabric store I could find.  One place had some of a similar fabric - but only in baby blue.  Hmmm.  Well, baby blue it is!
So here are some pics of the process, as well as the results.  Actually worth every second of anguish, I think, just for the twirly fun the girls had.  I think I'll be re-doing part of Chloe's because the fabric for the waistband isn't stiff enough for my taste.  But otherwise I'm pretty pleased with my pettitskirt persistence.

I found excellent tutorials at 
and

The first step is the ruffle fluff.  I ended up using about 35 linear yards on Evey's.  I didn't really keep track of Lily or Chloe's, but it was probably close to the same, maybe 40 yards.  Based on the tutorial instructions, they all should have been more in the 60 yard range, but I was dealing with my mis-figuring, plus learning the ruffler foot functions.  Instead of 3 to one on the ruffle-to-tier ratio, I think mine was more like 2.66 to one.  I didn't notice much of a difference though in mine and the ones at the store.


Once the ruffle fluff is attached to the bottom tier, they, together, are attached to the top tier, then sewn to the long edge of the waistband, just like in the tutorial.  The waistband is 2 x the waist measurement in length, and 2 x a tier in width.  (For Evey, the waistband was 38" long by 8" wide because her waist is 19 inches and the tiers are each 4" wide).  Repeat the process: fluff to tier, tier to tier, tier to waistband on the remaining long edge.  It looks like this. 

It's amazing how fluffy it gets!  This is just one side of fluff  and tiers before being sewn to the waistband.


Now it's just a matter of sewing the ends to each other, sewing a casing, and voila!  At least, according to the tutorials.  I, myself, topstitched the waistband, sealing it all together rather than leaving it open to the elastic casing.  Also, as you can see from this picture, it was a bit see-through.  (can you see my hand & ring?) I planned on having the girls wear leggings underneath, but for times when they weren't, I went ahead and added one more layer - a built in slip with the same fabric I used for the waistband.


The "look" I wanted with the skirts included tight little girl t-shirts, knee-length leggings, and converse chucks.  The weather was colder than expected, so jackets were added on-the-fly, but I was quite pleased with the overall look.  I found pink sparkle chucks for Evey that made me happier than is rational.  Lily's shoes had sparkly toes, and Chloe's were plain - unacceptable.  So Easter Eve I was gluing tiny jewels on Chloe's shoes so that she could sparkle too.  How much fun to have girls! 


I have the honor to teach the Sunbeam class at church.  The first great thing about Sunbeams is that they are three and four years old.  Absolutely one of the craziest ages of childhood!  We have dancing, fighting, spontaneous hugging, weeping, wiggling and giggling every week; never, ever a dull moment.  The second great thing is the lesson subject matter.  While it is lovely to teach deep doctrinal topics to adults, or simplified versions to teens and older children, nothing - NOTHING beats Sunbeam lessons for opening my eyes to the power of the profoundly simple.  Life is richer when I am weekly preparing topics like, "I am thankful for water."  As I find pictures of water in different forms, rain & snow, river & lake, I find myself noticing the beauty and necessity of water that I would be otherwise taking for granted.  (Plus I get the fringe benefits of belly-laughs that come from moments like when one of my little pupils ran to his parents after the lesson yelling at the top of his lungs, "MOM! GUESS WHAT?! IF WE DON'T HAVE WATER, WE DIE!!")

With that intro taken care of, I've decided to start posting some of our fun projects on my blog - mostly as a reference for myself, but also to share ideas.  This past week the lesson was, "I am thankful for fish."  Having recently seen a craft blog extolling the joys of contact paper projects, I decided to give that idea my own twist.  I found a basic fish pattern online, fit two onto a sheet of cardstock, printed them out  and cut them out.  I free-hand cut out the center of the fish in a kind of oval shape.

I purchased contact paper and three colors of flat sequins. (Lily picked out the colors for me.  She has a great artistic eye for color combinations.) 

Cutting a strip of contact paper the width of the fish, then folding the strip in half lengthwise, I peeled off the backing of one half and stuck down the cardstock fish cutout.

Here's where it gets fun!  The kids stick the sequins all over the fish "body" to give him "scales."  Some kids are random, others have a plan, so all of them come out unique.  I'm sure that when I do this with my own kids, the older kids will come up with stripes and patterns.  My Sunbeam class favored the random approach.  (FYI - for a half sheet of paper-sized fish, it took about 40-45 scales to cover nicely.  I gave each child 15 of each color.  I always separate projects into individual units of supplies so that each child has his or her own stickers, pieces, whatever we're using that week.  The first time I did a project, I had foam stickers and just dumped them out in the middle for the kids to choose from.  It was just like a shark feeding frenzy on a Nature show!!  Since then, supplies are always pre-prepared in ziplock baggies :-)  )


Once the body was covered with scales,  I peeled the backing off of the other half of the contact paper strip and folded the whole thing closed (CAREFULLY or it wrinkles) - sticky sides together.  I pressed it flat and cut around the fish, leaving a little bit of an edge to seal it.

That's it - happy little fish. They look good on both sides, so would make a fun mobile, and when the kids were playing with them by swimming them around on the window, they surprised my by looking like stained glass.  Totally makes my mind spin with future possibilities!
I've loved to sew from clear back in Home Ec.
But ruffles are one thing that make me a wreck
All of my nerves start in to twitch
At merely the words, "run a gathering stitch."

But three little daughters make ruffles a need
For princess dresses & tutus they plead
So one day, while I was browsing online
A ruffle foot I was delighted to find

It ruffles and pleats all on its own!
Just slide in the fabric & gathers are sewn
How did I not know about this device?
For ready-made ruffles I'd pay any price.

Luckily it only cost about 20 bucks
Now I'm happily sewing ruffles & tucks
It took time and it broke needles figuring it out
But I'd hate to go back to living without

O Ruffler foot, you're my new bestest friend!
Together, our projects will know no end!


Next time I post, I'll show what my crazy ruffler foot and I have been up to.  It is a TON of fun!
St. Patrick's Day has always been a quirky day for me, since my childhood when my fantastically fun Mom would dye everything in the fridge green. Keeping the tradition, my kids started the morning with either green oatmeal or cereal with green milk. I love playing leprechaun and watching them giggle when they discover that the milk turned green in the night. I wasn't sure what to do for dinner, a traditional irish meal, or more food-colored items, but then I found spinach tortillas at the grocery store and decided on green quesadillas and fajitas. I made lemonade, then initiated my oldest into the insanity by handing over the food coloring to let him dye it green. Peas for the vegetable topped it off, and voila! Green dinner.


Doesn't look tremendously appetizing does it? The peas are especially un-photogenic! But it was hilariously fun for the kids.

After dinner, I broke out a surprise craft - which was basically the stuff I had left over from a school project for my 2nd grader's class. When I volunteered to do a St. Patrick's craft for the class, I had no idea how hard it would be to find a decent St. Patrick's day craft. After pages and pages of "tutorials" that told me to give the kids a piece of construction paper and have them cut out a shamrock (seriously? Are there people who need a tutorial that says "1- give the kids a piece of paper 2- tell them to draw a shamrock shape 3- have them get their scissors out and cut around the lines 4- Enjoy your St. Patrick's day shamrock." Maybe I'm offending someone, but even the craft-challenged could figure that one out by themselves, I'm thinking), I came up with a craft of my own. And I've decided to post it. It isn't the best craft in the world, but it was fun. It makes a leprechaun hat out of green disposable cups.

Supplies needed:
  • Green cups - I used plastic ones because they were completely green, the paper ones usually have white bottoms.
  • Card stock - you can get two brims on one piece of cardstock - see pic below. I measured the diameter of the cup's lip, then made the interior circle 1/4 inch smaller. Then I traced another circle around it 1" bigger all the way around.
  • Ribbon - I found some cute grosgrain ribbon, but felt would work too. I cut 12 inch lengths to be able to go all around the very bottom of the cup, though most of the kids chose to put their hat-bands higher.
  • Glitter Fun Foam - cut into one inch squares, then cut a small square out of the middle to make it a buckle.


Assembly:
  • Cut out the circles and remove the center circle, making a doughnut shape.
  • Turn the cup upside down and drop the circle over the upturned bottom of the cup. The lip of the cup keeps the circle from sliding completely off. This is your hat's brim.
  • Wrap the ribbon around the cup to form a hat band. In the 2nd grade class, I had them use glue. At home, to avoid messiness with the littler kids, I used double-sided tape. I wish I weren't out of glue dots, because that would have probably been easiest.
  • Glue or double-stick tape the "buckle" over the spot where the ribbon overlaps.
  • Optional: my kids wanted to add shamrocks. so I accommodated them.


Like I said - not a complicated project. It's just a simple craft idea. But I think they were both fun to make and turned out pretty cute. It is festive to see them sitting all over around the house.

So that was my St. Patties day. After spending the morning and most of the afternoon fighting off a monster headache, I was just so glad that the pain cooperated enough to let me have a fun night with my little lads & lassies - the sweet bairns are such a joy!!
It all started with a simple decision to clean my room first. On a normal day, breakfast is followed by getting dressed and cleaning up breakfast, then the kids play while I do my hair a bit, and then the day goes on from there. This morning my Mom called after breakfast, and the kids were in a particularly rowdy mood, so I made the decision to start in my own room first so that I could hear the phone conversation. I made my bed and put away some clothes. No big deal, right? Except that it started a chain-reaction of events that lead to probably the worst possible impression that I could have made on my new neighbor, who stopped by to introduce herself and her two little boys.

Because I didn't get Evey dressed right away, she leaked through her diaper and peed on the couch. Because I had to clean the couch, the cushions were all wet. Because I was busy dealing with that, I hadn't taken the front room couch cushions out of my bedroom windows (where they spend the night, doubling as blinds until we can get real window coverings up). Because Evey was a mess, I decided to give her a bath. Because of all of this, I was dressed in clean-up grubbies with my newly cut hair pulled into multiple ponytails to keep it out of my way (ready for a magazine cover-photo gorgeous!).

That was where we were at around 10AM, when the doorbell rang. My new neighbor had just moved in and came over to introduce herself and her adorable little boys. Right off, I was off my game. I looked like a hag and felt self-consious, and my living room cushions were still in my bedroom windows, so there was no sitting and visiting there. "Come on in," I say as we walk in to sit on the family room couch. Except the couch was sopping wet from being scrubbed. Oops! We'll just stand and talk in my disaster of a kitchen with breakfast dishes still all over the table (because I'd started in my room instead) and papers all over the bar since I had started the morning working on registering all my new appliances. Feeling massively self-conscious, I called the kids in from the back of the house, where I swear it sounded like they were killing each other. They came tumbling out of the hallway in the roar and chaos stereotypical of the way large families are always portrayed in the crappiest of pulp-fiction formula novels. They were dressed in a random assortment of part-dressed, part-jammied, part-costumes reminiscent of the Lost Boys from Peter Pan. I think my poor new neighbor was a little terrified when her oldest son, who is about 5 years old, went downstairs with my three oldest kids to play.

We spoke together for a couple of minutes, then were interrupted by her son running back up the stairs in tears. He had been jumping on the little exercise trampoline that my kids have, and he fell off. Seth, dramatic as ever a ten-year-old could be, felt compelled to speak up and say, "well at least he just scraped up his hands. If he had fallen the other direction he would have split his head wide open!" Nice. I'm sure that kid will be coming over to play soon!

Remember now that Evey (and Chloe too, who can't resist a bath no matter who it was intended for) is in the bath. A scream from Chloe, investigated by Seth, leads to the yelled-at-the-top-of-the-lungs report that "MOM! EVEY POOPED IN THE TUB!!" Perfect. Walking my new neighbor back toward the front door now, while trying not to yell at Seth, who is bouncing up and down saying, "It's okay, Mom, I'll get Evey out of the tub," over and over again, and me replying, "No Seth," over and over again between polite conversation while the sweet neighbor puts her boys' shoes back on (she made them take them off to come in the house) and escapes.

Whenever people say to me, "five kids!?! You must have your hands full," I think, "how stereotypical." A house full of kids does not have to mean chaos. It is busy, and often loud, but not in a "little old woman who lived in a shoe," kind of way. Except for those odd days when it all seems to explode uncontrollably; when the forces of the universe combine to create the perfect storm of noise, mess, and injury. Drop a perfectly quaffed, lovely new neighbor with her adorably perfect preppy toddlers into the eye of that storm, and I can't help but wonder what she walked away thinking about us! Poor housekeeping, pathetic personal hygiene, wild out-of-control children, mess and chaos and insanity.

As for me, I'm feeling embarrassed and determined to somehow rectify the first impression. On the other hand, I can't help but laugh sadistically every time I think of the look on her face as she was leaving. Completely freaked out!!
 
© 2012. Design by Main-Blogger - Blogger Template and Blogging Stuff