Easter and Christmas are my two big dress-making occasions every year. I like to sew in between, but the Easter and Christmas dresses occupy my mental RAM
way before the actual dates. I enjoy brainstorming and designing well in advance...though I still usually end up finishing at midnight the night before! My inspiration comes from different places each time, and this year it came from the fabric itself. I found a piece of grey I loved, already had a piece of sheer yellow I wanted to use, and the rest became a puzzle of how to coordinate three dresses that were in perfect harmony without matching (not that matching is a bad thing - I just LOVE to suit each girl and end up with a total look wherein they fit together but are still individuals. I feel that I could buy matching dresses in different sizes at stores - If I'm going to the work of sewing, I'm going to take the extra time to make each one unique...plus then my youngest has different hand-me-downs to look forward to rather than wearing the same dress her entire life as she just keeps growing into her older sisters' identical dresses ;)! )

Anyway, yellow and grey are all the rage right now (I found out AFTER I had these underway. Does that make me super-hip because I thought it was chic on my own, or uber un-hip because I'm so out of touch I didn't know it was hip?), and with Easter being so early, I knew I wanted a light jacket of some sort. There is nothing more annoying than putting hours of work into a darling dress only to cover it up with a random coat! Not finding anything in pattern books, and being a HUGE fan of all things steampunk, I designed three different peplum jackets. I had to change out one of the original fabrics when I made the peplum decision, since the stripe wouldn't work with the swing of the peplum, but I was so very happy with the results all around that it made the extra fabric vexation worth the effort. Again, after getting well into sewing, I discovered that peplum jackets are on the fashion rise as well, so I'm sure there will soon be darling patterns that will make life a LOT easier for others wanting to replicate these looks :-P In the meantime, here are the patterns I used and some pics of the finished products:

Romantic Sheer Jacket over Grey Print Ruffle Dress


For my ten-year-old, I wanted her ruffles to be sweet, but age appropriate. I didn't want her to look like I was dressing her like a toddler! Choosing a lower-calf-length for the dress, and making the ruffles themselves longer (a full 8 inches each), plus the elegance of the fabric - which is a high-end apparel cotton which is a dream to sew on, achieved exactly the effect I wanted. The jacket is lined on the bodice for structure, then sheer overall and trimmed around the neck and at the waist. I do not know what the fabric is technically classified as! As much as I know fabric, I've never found this as anything but "unknown content." If anyone knows, PLEASE tell me, because I love it and I'd love to be able to order it by name. I've bought my girls everything from skirts to swimsuits made out of it and it's wonderful. Not chiffon, which frays, not tulle, which is stiff by design, not net. I call it a sheer knit, because that's how it behaves.
 |
| Detail of the vest front - I did a little bit of ruching, and used a transparent flower button. The trim was from Hobby Lobby. |
 |
| Detail of the sheer over the grey - I just couldn't get enough of it! SO sweet! |
 |
| The grey print fabric (from Hobby Lobby) was pretty pricey, even with a coupon, so I bought some poly-cotton in the closest grey I could find for the main skirt and used the print for the ruffles only. Saved myself from an additional half yard of the print fabric that way. |
 |
OK - getting technical - for the dress: This pattern, sleeve, bodice with the neck indicated (for all 3 girls' dresses) As I highlighted on the pattern, I LOVE, love this sleeve. I use this one over and over and over. It isn't huge puffed, can be eased to be totally flat, or you can throw a couple of gathers over the shoulder for a tiny bit of puff. It is an excellent length, excellent width around the bottom of the arm, I like how it binds it - just a great, great sleeve.
I did NOT use the skirt pattern for this, however, as it is too full to add the ruffles to. In order to do ruffles, the underskirt should simply be 1 1/2 to 2 times the waist measurement - a lovely easy rectangle. The length of the underskirt would be your chosen length minus about half the final ruffle. So if your ruffles are 6 inches each, and you want your finished skirt length to be 22 inches, cut the underskirt to be 19 inches long. Let me say one thing about sewing ruffles: I aced Calculus - I was a Physics major for my first year at college and I did quite well - I am not too bad at math - the logic of ruffles BAFFLES me!! I measured and measured and figured and figured and still ended up with something unexpected every time! So be flexible, have some faith in yourself, and be ready to curse those ruffles a few dozen times because they will drive you to distraction! |


For the jacket, I combined these two patterns, McCalls 4887 and Simplicity 4337. It's pretty straight forward. Obviously I didn't line the whole vest since I left it sheer, so the turning the whole thing inside out didn't apply. I also added a 1 inch ruffle all along the skirt portion of the vest.
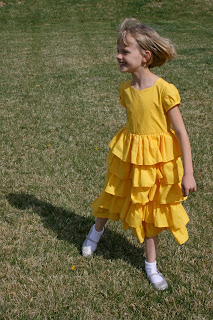
Little Girl Yellow Ruffle Dress with Grey Polka Dot Ruffle Peplum Jacket

For my youngest, I used the shortest ruffles for the pouffiest skirt. Cut to 5 inches, their finished length ends up at 4. No matter the girls' age or size, each skirt has five tiers of ruffles. I joked with the girls near the end of this sewing project that I had actually ended up making 15 skirts this Easter, by the time I was done hemming and ruffling each stupid little section! (my ruffler foot & sewing machine decided to have a disagreement early on and refused to work together. If I'd known, I may not have been so gung-ho for ruffles!).
 |
To add ruffles to underskirt: I'm sure there may be a smarter way, but this is what I did - using the middle sized (6-7) dress as an example:
- Figure out how long you want your ruffles. Here is where the headaches start! You'd think that it would just be a matter of taking your 22"skirt and dividing by 5 tiers to get 4.4" ruffles. However, first there is the matter of the ruffle itself losing some of that length to a hem and a seam allowance when you attach it. The formula for that is length + hem + seam allowance = finished length. But then there is the added complication of ruffle overlap. If you just assume ruffles placed end to end, your 4.4 inch ruffles will get to 22 inches - however, if you try it this way, you'll end up short. Ruffles need at least an inch overlap, which can be added to the length by, in my case of 5 tiers, adding 4 inches. (4 not 5 because the last ruffle doesn't overlap anything) So then 26 inches divided by 5 gives us 5.2 inches. We plug that into our formula:
- 5.2 + 1/2 inch hem + 1/2 inch seam allowance = 6.2 inch fabric strip for ruffle
- Cut ruffles to be 1 1/2 x the width of the underskirt. By width, I'm talking about width around. (I found that I liked the look of it better if I increased the fullness as the ruffles went down the skirt - so by the time I got to the bottom ruffle, it was a full 2 times the width of the underskirt. I did not go back and re-do the first skirt, and I don't think many would notice which ones are which, but I do, so I thought I'd note my changes.)
- Hem all ruffle sections with a tiny rolled hem.
- Run a running stitch along the top of all ruffle sections.
- Pulling thread and distributing gathers to fit ruffle to underskirt, and starting with the bottom ruffle, sew ruffle to underskirt - right sides together. On this one ruffle only, finish the seam by zig-zag stitching.
- Next, tack the very top ruffle on, right side facing out, gathering to fit. Now that the top and bottom ruffles are on, it is easier to find where center will be.
- With right sides together and the ruffle facing up - as in the picture above, tack down the center ruffle. Add the tier above and below, making sure they overlap equally.
- When happy with the amount of overlap and everything looks good, press ruffles down and topstitch all ruffles except the very top one (which will be sewn to the bodice, so it doesn't matter), as close as you can to the fold.
|
 |
For the peplum jacket, I used the bodice form McCalls 4887, featured above, a modified version of the sleeve from Simplicity 4337, also featured above, and a modification of the pattern piece indicated from this Butterick 4967. Plus I added two rows of very tight ruffles at the waist for detail, one of which continues all around the neck - which is particularly cute when she wears her hair up since the ruffle stands up like a little collar. The final touch was the giant rick-rack - which complimented the polka dots perfectly!
Sunshine Ruffle Dress with Hand Colored Peplum Jacket
|


The middle outfit is always the most tricky. It isn't always the outfit belonging to the middle daughter, but in this case, it worked out that way. I had the oldest and the youngest all figured out, but was stumped by what to do with Chloe, who just coveted the fabric I was working on for the oldest! Print, plain? What goes with both polka dot AND elegant twoil-like print? I finally found a beautiful black, grey and white butterfly fabric at Hancock Fabrics to coordinate. As you can see, I couldn't figure out if it should be the dress or the jacket! Chloe's such a good sport! When people ask me all the time how I design - THIS is how :)
 |
| Chloe modeling fabric for me to help me visualize. |
But I still had one more trick up my sleeve. The minute I saw the butterfly fabric, I knew I had to try customizing it to make it REALLY coordinate! So I did some research on the best methods of custom coloring fabric for detail work, bought the best rated fine tip yellow fabric marker, and went to town! OH! How much fun I had!! I cut out all the pattern pieces to start, placing butterflies where I wanted them and using McCalls 4887 for the bodice and improvising the peplum piece on my own as a modified circle with a long flat section in the back to form into a large pleat (very steampunk!).
 |
|

After I had my pieces cut out, I started coloring in butterflies. The concept was kind of a color wash. The bodice front had every butterfly with some color, more color as it got toward the bottom. The butterflies on the sleeves were colored more sparsely - both in that not every butterfly got color, and they didn't get very much color. On the back of the bodice, I made a potentially dangerous choice to color only one butterfly right in the center of the back, giving it the most color of any other butterfly on the whole jacket. You'll also notice that a new color has been added to the yellow-grey theme! I started at first only using yellow, but from a distance, the butterflies ended up looking more like bees for some reason. I opted to pop in a tiny bit of aqua/turquoise and it totally did the trick! To pull the coordination across the girls, I also went back and colored some of Evey's polka dots too.
 |
| Pleated peplum jacket, 3/4 sleeve, scoop-backed peplum, custom colored butterflies - my favorite part of this jacket is the bright butterfly right in the center of her back! |
 |
| This jacket is so perfect for my fashionista! (So sad her allergies were bugging her so bad that day!! Poor puffy red eyes!!) No two butterflies are alike. |
 |
I love being able to design for these gorgeous girls!!
(FYI - hair accessories courtesy of my talented mom.) |
 |
| I do have cute boys too! These are my two amazing guys!! |
 |
| And when you put them all together..... Hooray! Another coordinated Easter! Not sure how many more years they'll cooperate with my crazy. :) |
 |
| OH - I almost forgot - Thought I'd add just a couple more pics of the dresses WITHOUT jackets. They're adorable on their own too! |


 Anyway, yellow and grey are all the rage right now (I found out AFTER I had these underway. Does that make me super-hip because I thought it was chic on my own, or uber un-hip because I'm so out of touch I didn't know it was hip?), and with Easter being so early, I knew I wanted a light jacket of some sort. There is nothing more annoying than putting hours of work into a darling dress only to cover it up with a random coat! Not finding anything in pattern books, and being a HUGE fan of all things steampunk, I designed three different peplum jackets. I had to change out one of the original fabrics when I made the peplum decision, since the stripe wouldn't work with the swing of the peplum, but I was so very happy with the results all around that it made the extra fabric vexation worth the effort. Again, after getting well into sewing, I discovered that peplum jackets are on the fashion rise as well, so I'm sure there will soon be darling patterns that will make life a LOT easier for others wanting to replicate these looks :-P In the meantime, here are the patterns I used and some pics of the finished products:


 For my youngest, I used the shortest ruffles for the pouffiest skirt. Cut to 5 inches, their finished length ends up at 4. No matter the girls' age or size, each skirt has five tiers of ruffles. I joked with the girls near the end of this sewing project that I had actually ended up making 15 skirts this Easter, by the time I was done hemming and ruffling each stupid little section! (my ruffler foot & sewing machine decided to have a disagreement early on and refused to work together. If I'd known, I may not have been so gung-ho for ruffles!).


 After I had my pieces cut out, I started coloring in butterflies. The concept was kind of a color wash. The bodice front had every butterfly with some color, more color as it got toward the bottom. The butterflies on the sleeves were colored more sparsely - both in that not every butterfly got color, and they didn't get very much color. On the back of the bodice, I made a potentially dangerous choice to color only one butterfly right in the center of the back, giving it the most color of any other butterfly on the whole jacket. You'll also notice that a new color has been added to the yellow-grey theme! I started at first only using yellow, but from a distance, the butterflies ended up looking more like bees for some reason. I opted to pop in a tiny bit of aqua/turquoise and it totally did the trick! To pull the coordination across the girls, I also went back and colored some of Evey's polka dots too.


2 comments :
You are so talented! I love your work. My youngest (18) wants a maxi dress but can't find one short enough to fit. She takes after me a bit :) I think I'll tackle that project for her to see what I can come up with. I have ideas in my head, but they don't always work out, LOL
A group of lovely children.
Their mother is very will take care of them!
They chose the dress is really nice!
Post a Comment