What I love most about sewing for my girls is that I can coordinate them yet design for each of their personalities and body types. It gives me so much joy to think about what would compliment each girl individually, then try to dovetail those designs with an overall concept.
Grecian Ombre Maxi-dress
My oldest is tall - the tallest girl in her 5th grade class! Putting her in a long maxi-dress that emphasizes her tall, thin figure was just too tempting. For her, then, the concept was Grecian. I used a pajama pattern, actually - Simplicity 4767, view A.
I increased the length and instead of gathering the sleeves in, I cut them a bit shorter, did a tiny rolled hem and left them open - creating a ruffle-like sleeve instead of the puffed peasant sleeve. I also did a bit of a smocking-like waist instead of making a casing. By using a thick elastic thread and a narrow zig-zag stitch, I made the first line at the place I wanted the waist; adding more until it was the desired width.


I'll get to the ombre dyeing later, but I also added the embellishment of ombre knit flowers made from the same fabric as the dress. These are super simple.
Cut flower shapes - they can be pretty messy and random because as they are sewn to the dress, they are gathered and scrunched to give them dimension. I actually made way too many and couldn't figure out what I didn't like about her dress the first time she wore it. Then a few of the flowers started falling off due to some bad quality thread and I found that I liked it better! I took some more off, re-positioned the rest and loved the result. MORE is not always better!
 |
| For a Grecian dress, I designed a Grecian braid. Anyone interested in a tutorial? |
Designer Ruffle Ombre Maxi-dress
Most of the time I end up loving all of the dresses equally but for different reasons, but this time, this dress is my favorite of the three! The concept behind this dress came from the idea of making the skinniest maxi-dress possible for this tiny pixie-girl. Instead of a pattern, I used a tshirt of hers which fit the way I wanted as a guide.
 Extrapolating the shape of the rest of the skirt from where the shirt ended, I ended up with a v-neck design tight through the waist and flaring slightly through to the floor.
 But the true joy is in the ruffles embellishing the front of the dress.
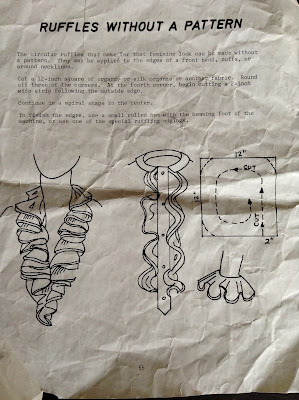
I knew what I wanted to do here when I found this instructional guide among a box of random interesting stuff my grandma gave me years ago and I've been just recently going through a bit at a time.
Following the instructions, I cut squares in various sizes from the pink fabric, then cut the spirals through to the center. This made 5 ruffles, all different lengths.


Butterfly Maxi-dress
Back to the butterfly dress . For this dress I used Simplicity 5695, and combined views to get the desired result. I did shorten the sleeve a little to get more of a cap-sleeve. Then I took a couple of butterflies, backed them with pink knit, and sewed them on through the center of the butterflies as a dimensional appliqué.

Ombre Dyeing
I started off my ombre experiment by following the ombre dyeing instructions on the RIT dye website. More or less. I didn't wrap my dresses around a pole, and I didn't dye to the top of the dress - just the bottom.
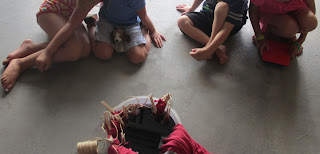
Plus I kept mine moving a lot more - not wanting a distinct line. I also tried dyeing the flowers and the ruffles. It was a fun process and I gathered quite an audience!
It took longer than I expected, made a bit of a mess (NOTE: Do not hang dyed dresses to dry on vinyl fence or railing - even after they have been rinsed. Unless they've been thoroughly washed, they still have dye in them and WILL dye ivory vinyl PURPLE!!)
My first dye job was a failure :( I was so excited by how the dresses looked. The Grecian dress was finished except for the flowers, the ruffle dress wasn't anywhere near finished, since I had to individually dye each ruffle and the sleeve ruffles before sewing them on, but I could still see how gorgeous they were going to be. I followed the instructions - rinsed in cold, then in warm, then washed in the washing machine. All the dye came out. Almost all the dye. Enough stayed in to make the pink dresses look dirty, like they had been in the mud. I was SO upset! I was ready to sew on the ruffles and have the girls wear them to church the next day! Alas, it was not to be.
 But if at first you don't succeed, dye, dye again. With a second packet of RIT, this time I followed the instructions on the box, boiling the water. This process wasn't quite so fun. Working over boiling water was hot and sweaty, especially as I employed dip-dye techniques of keeping the fabric moving almost constantly to avoid lines of dye. Plus these instructions double the ombre instruction dye time - so it takes twice as long! But it WORKED!!
 Hanging them to dry in a safe place, then washing them according to instructions, I was so excited with the results! There are distinct lines in a couple of spots, and the purple still is darker, more plum than I initially hoped, but I still think the dresses are elegant!
 |
| First Attempt Dyeing Flowers: Wicking |
 |
| Second Attempt Dyeing Flowers: Tie-Dye |


3 comments :
I adore you. As in, ADORE. First of all, I had to click because that first photo of your girls is to die for. I love it. I love every single thing about it. Beautiful.
Also? I miss you like crazy, and now I want to buy knit (SO. Hard. To. Find.) and try this new ruffle thang! Holy cow woman.
Huggs.
P.S. Can I come over sometime and have you give me a braiding tutorial in real life? I think it has been 20 years since I did a French braid...I need help!
I would LOVE for you to come over and play hair and sewing and whatever other fun we could come up with!! Any time!
Post a Comment